
This RV newscast will cover the latest RV and travel data news. April 2025 RV production numbers are out, and we’ll cover the latest travel data so you can better gauge if it’s time to buy, sell, or hold an RV. Later, we’ll do a general RV news round-up, including looking at RV valuations, results from some large industry players, some industry consolidation, and the latest on legislation that may affect the industry.
RVIA Numbers
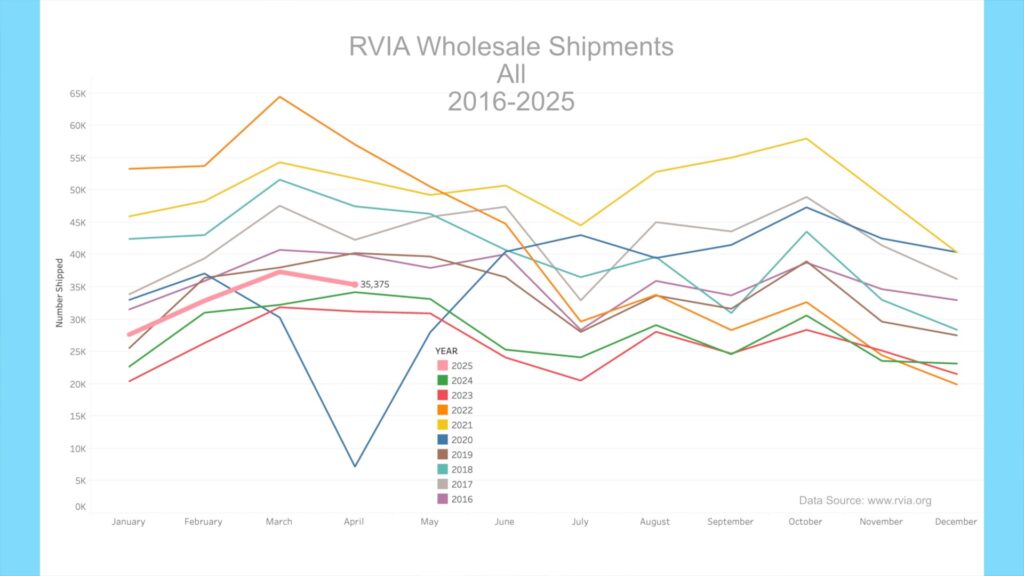
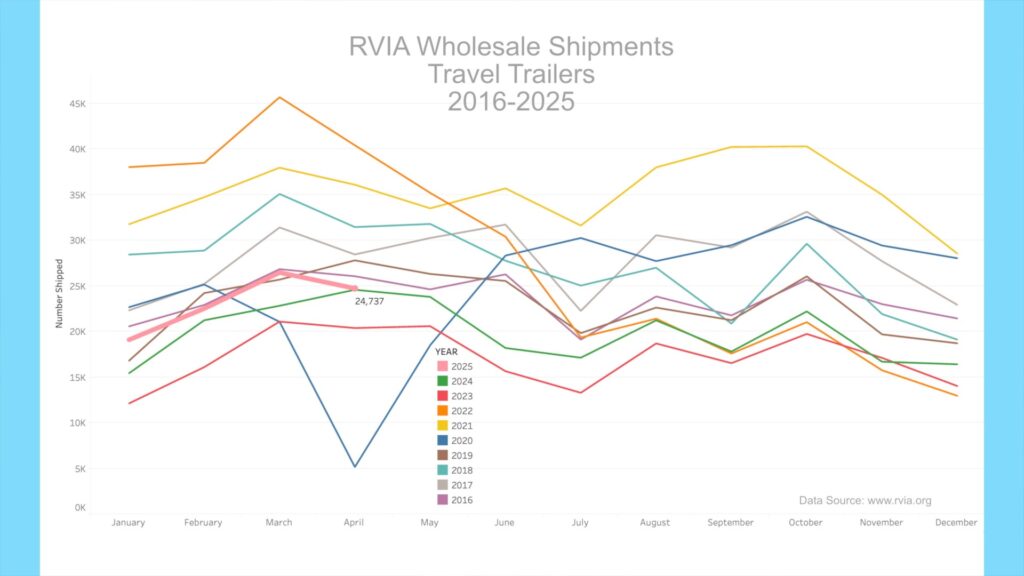
On May 26th, 2025, the RVIA posted the latest RV wholesale shipment data for April 2025. Production increased slightly compared to the prior year, with 35,375 total RVs shipped in April, up 1,178 or 3.4% year-over-year. April 2025 beat 2023 and 2024 April shipments but was below all other recent years, including 2016. Travel trailer shipments increased year-over-year, with 24,737 units shipped in April 2025 vs. 24,589 a year ago, up only 148 or less than 1%.
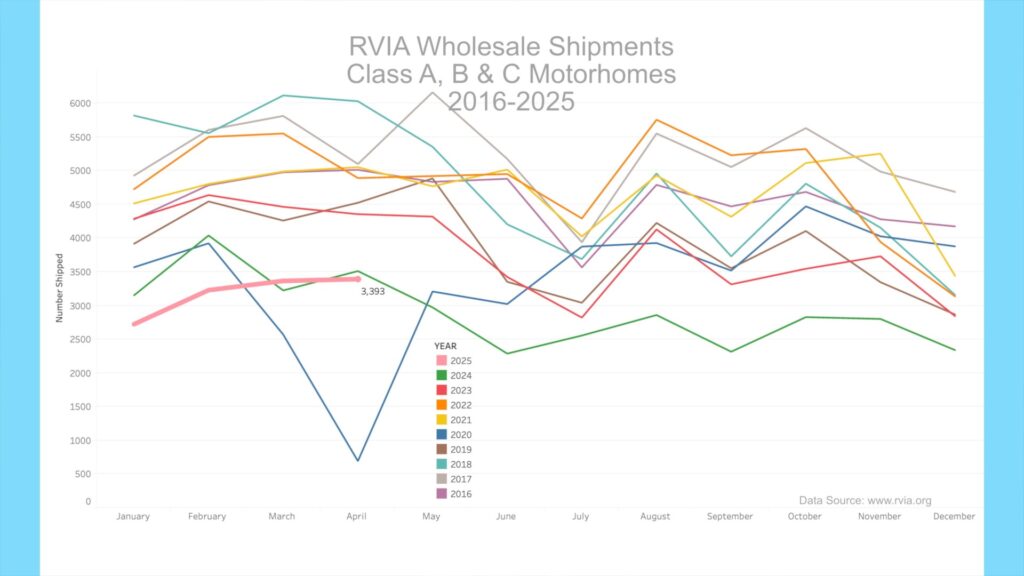
Motorhome shipments, which include Class A, B, and C motorhomes, were lower than in April 2024, with 3,393 units shipped, a decrease of 119 units or 3.4% year-over-year. The segment continues to suffer a significant slowdown.
RV Trader Numbers
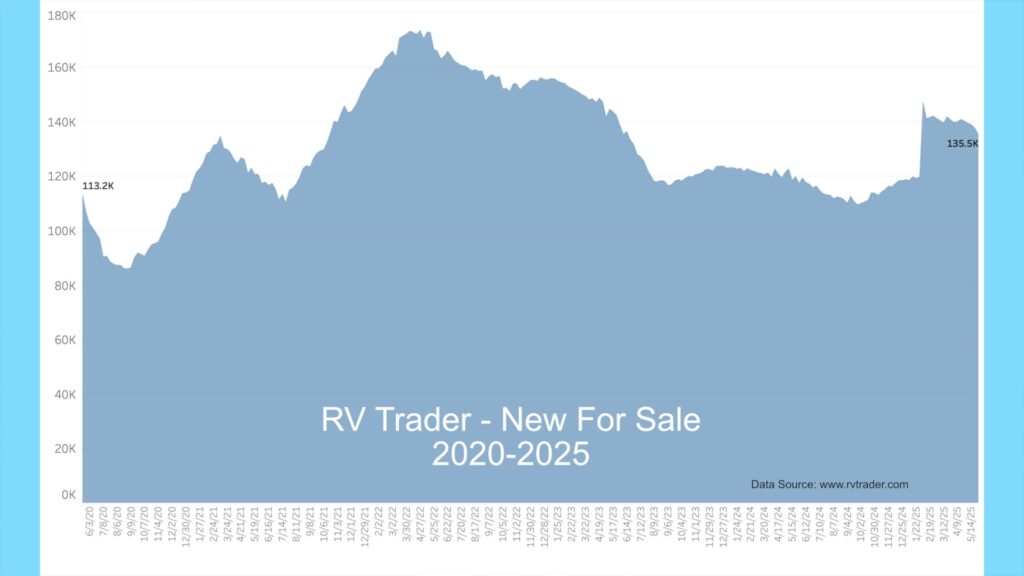
RVs for sale on RVTrader.com have decreased since last month, with 135,541 new RVs listed as of May 28, 2025. This is down from 139,525, or 3,984 units or 2.9% from a month ago, and up 18,096 or 15.4% from a year ago.
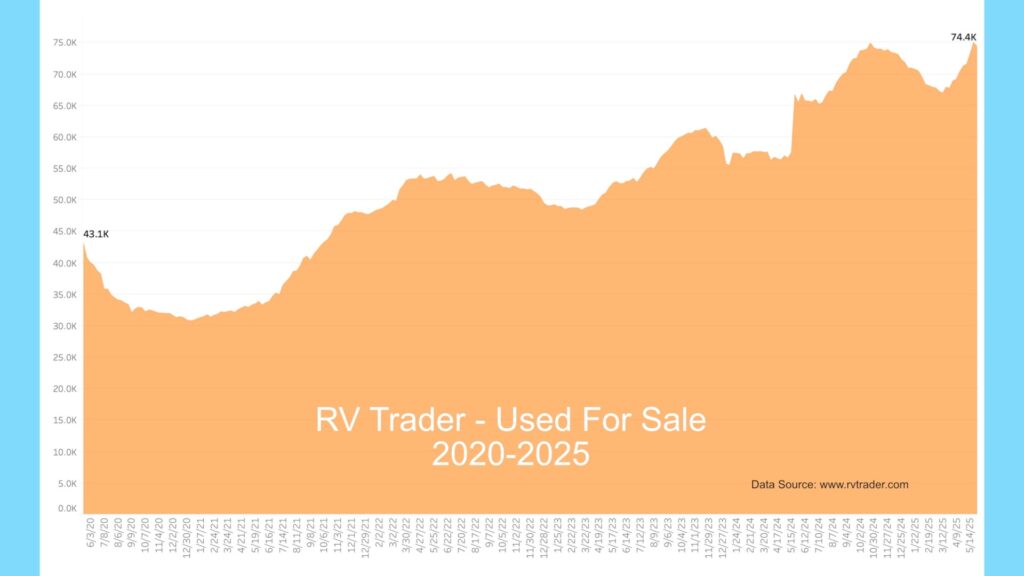
The number of used units has increased again in the past month, with 74,356 used RVs for sale as of May 28th. This is up by 2,813 units, or 3.9%, compared to about a month ago and significantly up by 8,923 units or 13.6%, compared to a year ago. It seems evident that there is an increase in the unloading of used units this Spring season. I believe we are continuing to see the results of mass inoculation of RVing by pandemic buyers.
Model Year Charts
Our model year chart shows new model volumes for 2022 through 2025 since May of 2023. As dealers unload the older units, 2022 models, as indicated by the blue line, have decreased from 39,100 to 801 units, a decrease of 45 since last month. The orange line shows 2023 models decreasing from 93,797 to 2,232 since late June 2023, a decrease of 349 since last month.
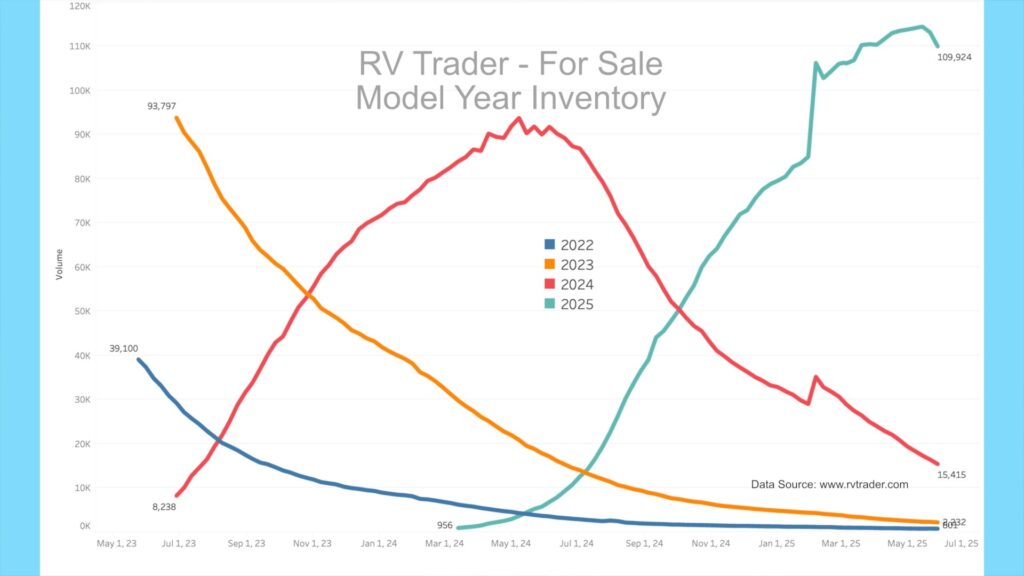
Meanwhile, the red line shows 2024 models going from 8,238 in late June 2023, ramping up last spring, and now at 15,415, down about 4,000 units since last month. It appears that the significant clearance of 2024 units is still ongoing, as 2026 models are scheduled to arrive at dealer lots shortly. 2025 units, as shown by the teal line, have ramped up and are now beginning to drop off. There are currently 109,924 2025 units for sale, decreasing by about 3,800 in the past month.
New RVs – Weeks on Market
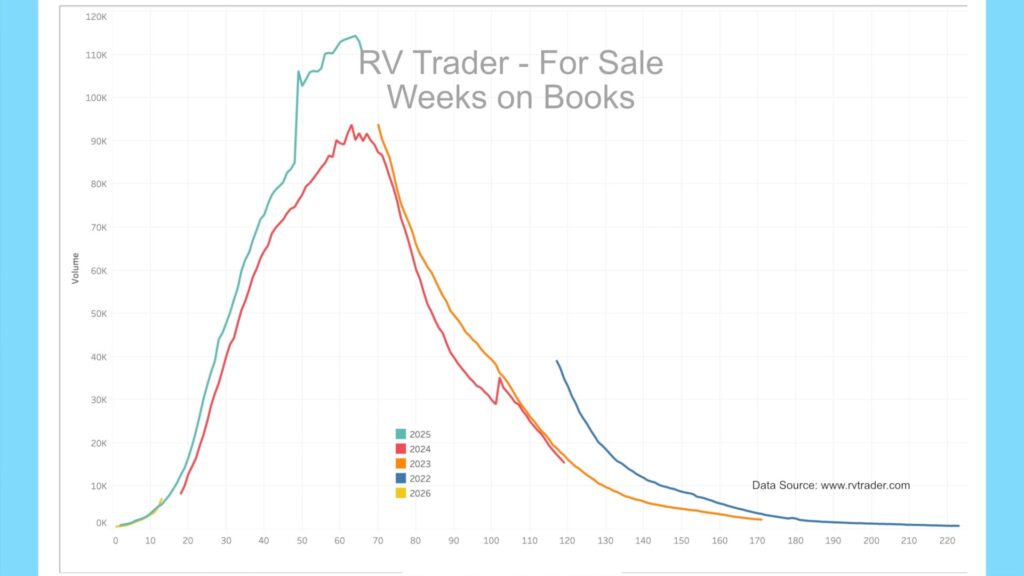
Looking at the model year data by the number of weeks on market, we see that 2025s (teal line) ramped up much more quickly than 2024s (red line) at the same number of weeks on market. Also, the 2024s are falling off slightly faster than the 2023s (orange line). The 2024 model year looks like a historically low production run that ended last summer. It appears that the industry has overproduced 2025 models, which should result in some real deals as 2026 models arrive shortly. We have recently included 2026 models in the chart data, and at week 13 on market, 2026 models are mirroring 2025s so far.
As a reminder, many but not all dealers advertise on RVTrader.com to sell inventory. It remains an excellent proxy for overall dealer inventory. You can follow my account on X at @JohnMarucci to receive weekly updates on this data.
High-End Market – Colonial Airstream
For the high-end market, inventory levels for Colonial Airstream in Millstone Township, New Jersey, the nation’s 2nd largest Airstream dealer, still show a glut of in-stock units.
As of May 28th, Colonial had 125 new units on the lot for sale, with eight spoken for. This is up from 116 and 7 spoken for about a month ago. Interestingly, Colonial continued to hold steady on new orders, not ordering since last month. Its order book still shows only 11 units (vs. 40 in late January and 47 in late November). A year ago, Colonial had 43 units on order.

This indicates that Colonial has put the brakes on new orders as their lot is full of 2025 models. The 2026 models are expected to arrive shortly, so with nearly 120 high-end 2025 model Airstreams on their lot, they appear to be signaling a problem with unloading these existing units.
BLS RV Manufacturing Labor Stats
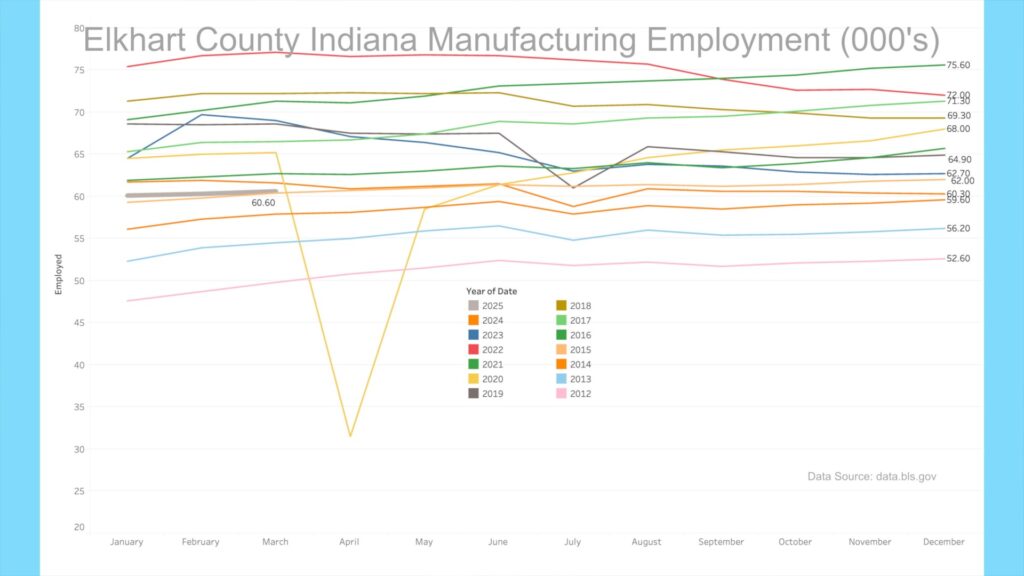
The Bureau of Labor Statistics published revised March 2025 manufacturing employment numbers for Elkhart County, Indiana. The current manufacturing employment level was 60,600, just above the March 2015 level but significantly below that of 2016 and later years. The BLS is forecasting that manufacturing employment will remain steady in April 2025.
AAA
Gas prices continued to drop in the past month. According to AAA, the current average nationwide price as of May 31st was $3.15 per gallon for regular unleaded, down 3.2 cents from a month ago and down about 41 cents from a year ago. An RV trip of 3,000 miles at 10 mpg would cost $945 now vs. $1067 a year ago, an 11.5% decrease.


Diesel prices have also decreased over the past month and currently stand at $3.53 per gallon, down 2.9 cents from a month ago and 34.2 cents from a year ago. A similar 3,000-mile trip, getting 12 mpg, would cost $883 now, compared to $968 a year ago, representing an 8.8% decrease.
News Roundup
California CARB Exemption
We reported a few months ago about how new rules out of California might curtail the sale of motorized RVs.[1] The latest development is that the U.S. Senate has rejected California’s Clean Air Act waiver, effectively eliminating the state’s authority to enact clean air rules that are more stringent than those in the rest of the country. The governor and attorney general reacted sharply, saying they will file a lawsuit to keep the waiver. The CARB is leaving the current rules in place for 2026 model trucks until the situation is settled. If the new regulations hold, it would strip the state of significant authority to set different and more stringent rules.[2] If you’d like to know more, we discussed this in detail in a prior newscast. We’ll put a link in the description.
Dealer Floorplan Deductions
Since 2017, RV dealers have been unable to deduct floorplan loan interest as a business expense. Most dealers finance new RVs on their lots for sale, and these inventory loans are referred to as floorplan loans. The interest they pay on these loans was deductible prior to a 2017 law. This reversal, which would allow floor plan interest deductions, is part of new legislation currently working its way through Congress. If passed, it would lower dealer expenses, potentially leading to lower prices for consumers.[3]
RV Valuations
The latest RV valuations are in from Black Book (a leading provider of vehicle valuation data), and wholesale valuations are mixed, with Towables down both monthly and year-over-year and Motorized RVs down slightly monthly but up year-over-year. Towable RVs averaged $17,778 in April, down 5.5%, or $992, from the previous month. A year ago, towable RV values averaged 9.3% more at $19,606. Motorhomes averaged $63,025 in April, down 0.8%, or $515, from the previous month. In April 2024, motorhome values averaged 6.4% less at $59,231.[4]


Thor Job Cuts
Earlier in the month, Thor Industries, the country’s largest RV manufacturer, announced the layoff of 570 workers as it consolidates its manufacturing operations in northern Indiana and southern Michigan. These layoffs affect the Heartland, Cruiser, and DRV brands. According to the Indiana Department of Workforce Development, Heartland will lay off 147 employees, Cruiser will lay off 251, and DRV will lay off 51 in the Elkhart Indiana area. According to the Michigan Department of Labor and Economic Opportunity, Heartland will lay off 121 employees in Sturgis Michigan.[5]

Camping World & Lippert Results
Recently, both Camping World (the nation’s top RV dealer) and Lippert (the largest component maker) reported quarterly results. These reports shed light on the health of the industry and its future, as these leaders often offer their opinions about the future.
Camping World lost money, and the forward-looking outlook is one of bracing for more challenging times. Camping World CEO Marcus Lemonis (LEE-mah-niss) said in a conference call the company had anticipated reductions of about $22 million to $23 million already planned to execute at the beginning of the year. However, due to less demand, the company made an additional $12 million to $13 million cuts by reducing headcount, eliminating initiatives, locking down travel, modifying pay plans, consolidating locations, and eliminating certain things “we thought were nice-to-haves, not have-to-haves,” Lemonis said. “To be really candid, we went to our 2008, 2009 playbook.” None of this is good news. Here, we have the CEO of the largest dealer stating that we are back to a deep recessionary stance, similar to 2008 and 2009.[6]
Lippert Industries reported better-than-expected results, with $1 billion in sales, an 8% year-over-year increase. Approximately half of the sales were component sales to original equipment RV manufacturers. These items, including chassis, doors, and windows, accounted for $531 million in sales, representing a 15% year-over-year increase. According to their CFO, Lillian Etzhorn, “the higher numbers were driven by an 18% increase in North American travel trailer and fifth wheel wholesale shipments, as well as overall market share gains. ” So, the gains are attributed to higher manufacturer shipments versus last year. Motorhomes, however, did not fare as well, with an 11% decrease in wholesale shipments.[7] In reality, this portion of Lippert’s sales is entirely dependent on RV manufacturers’ shipments, something that almost must slow for the 2026 model year as 2025 models are stacking up on dealer lots. This doesn’t bode well for Lippert’s future sales to manufacturers.
My Take
As I examine these data and reports, they point to an increasingly unhealthy RV industry. From the increasing number of used RVs for sale to dealers halting orders to layoffs and consolidation, it seems that we are at a new low point. Pricing plays a huge role, and the value exchange is not strong enough to attract buyers. Until a correction occurs and someone figures out how to build an inexpensive and reliable RV, I think the pain will persist for some time.

The ongoing perception of poor build quality and bad customer experience coupled with sky-high prices have turned the buying public and current RV owners cold on buying again. I am one of them. The overbuilding during the pandemic and the effects of a high inflationary period have decimated the industry. A great reset is happening, and industry leaders need to embrace it.
That should do it. All the best in your camping adventures!
As always, thanks to our fans who support our efforts by starting their shopping from our Amazon Storefront and their generous financial support by using the THANKS feature located under each YouTube video ($ within the Heart icon). Your support is greatly appreciated!
https://youtu.be/7JdZXsLewWI ↑
https://www.rvnews.com/senate-rejects-california-clean-air-act-waivers/ ↑
https://www.rvnews.com/floorplan-deductibility-provision-sticks-in-reconciliation-package/ ↑
https://www.rvnews.com/wholesale-rv-values-settle/ ↑
https://www.rvnews.com/thor-brands-to-cut-570-jobs-in-plant-closures/ ↑
https://www.rvnews.com/dealer-chain-ceo-prepared-for-potential-pullback/ ↑
https://www.rvnews.com/lippert-posts-highest-growth-since-2022/ ↑