
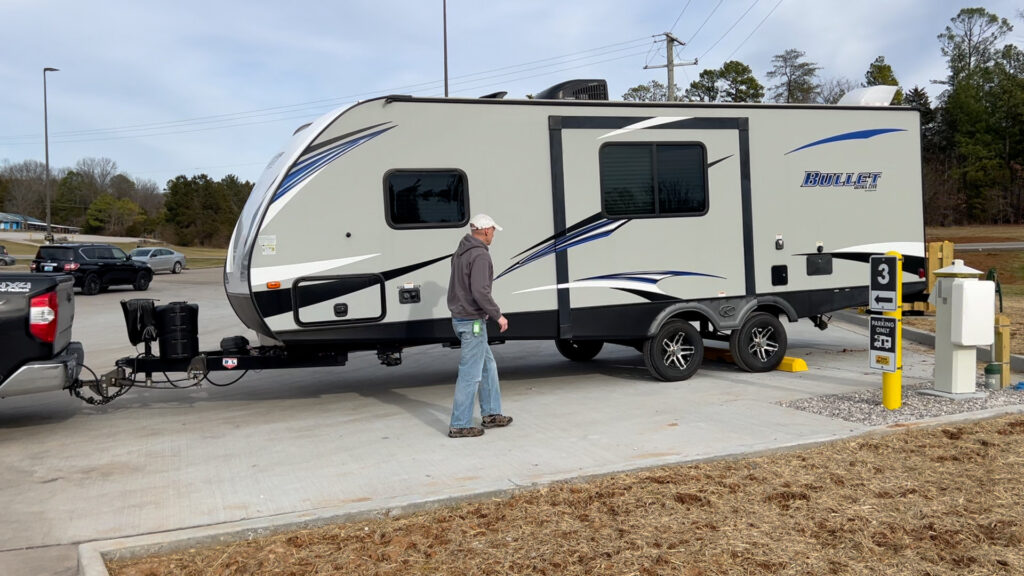
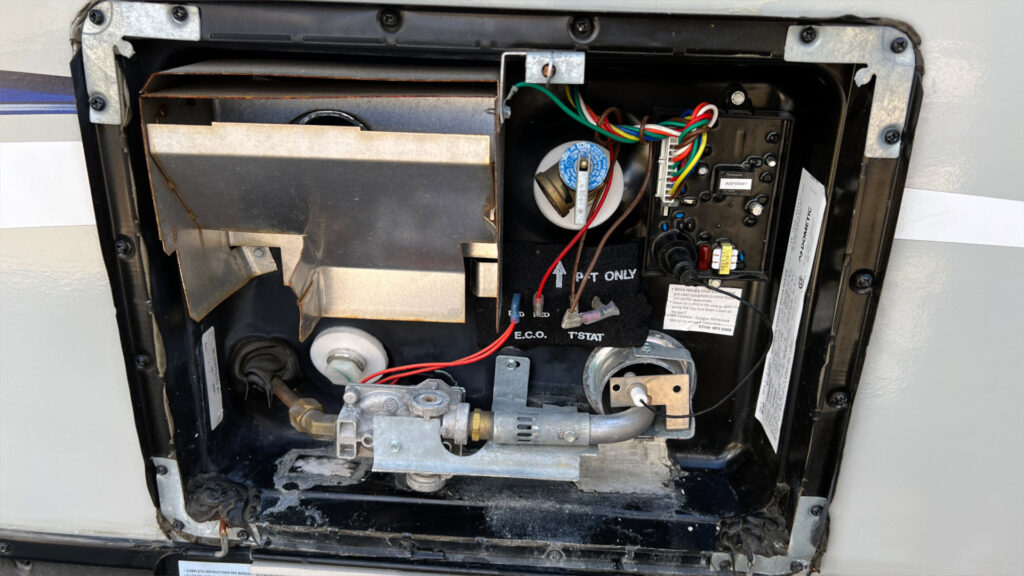
In this blog, we’ll cover the recent challenging experience with my Keystone Bullet’s Dometic water heater, the troubleshooting process, and the steps we took to fix the issue. Losing a water heater while camping is no fun and will likely mean you are at the mercy of the local campground showers and have no hot water in the rig for washing dishes.
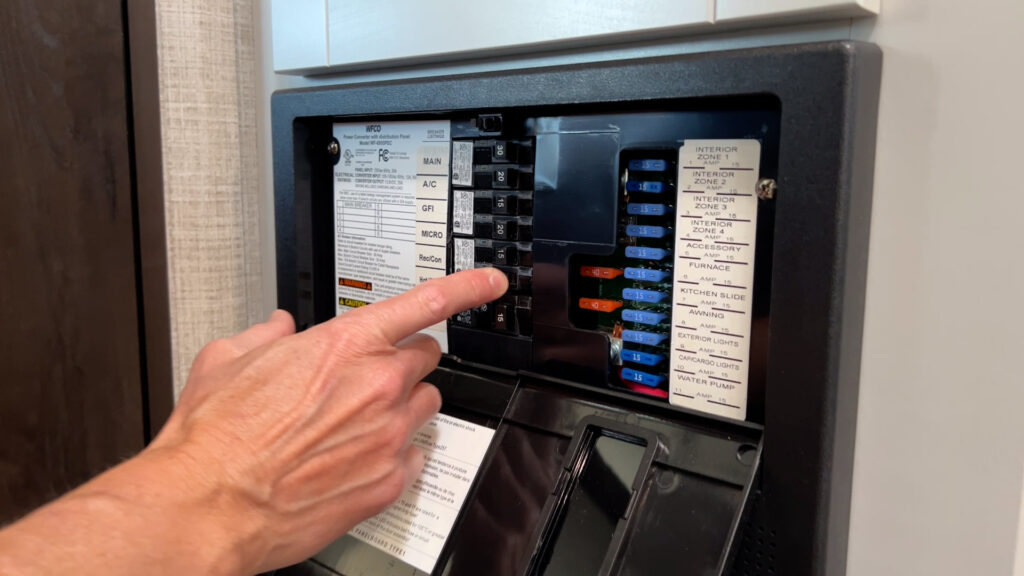
I am usually thorough about testing my RV systems before trips, and this latest trip was no exception, except we did not de-winterize before leaving due to colder weather. This meant we did not flush the plumbing lines of RV antifreeze or unbypass the water heater. The problem arose at our first stop overnight on the road. Temps were above freezing, and we decided to de-winterize. We happened to be at a full hookup Love’s RV stop, which allowed us to flush the plumbing lines and fill the water heater.
After de-winterizing, we turned on the propane to the water heater, and it tried to start, but the propane ignited for a very short time and then stopped. The water heater’s 6-gallon tank was full of pressurized water, and the electronic ignition had a clear spark, but after the first try, the propane would not ignite. The unit tried to start the usual three times before faulting out.
Next, we tried the electric heating element, which also would not come on. Usually, you can hear the electric element relay switch being powered by 12 volts to allow the 115V switch to engage. There was no indication from the water temperature that the electric element was working.
I own a multimeter and followed an excellent video on how to test the water heater using a multimeter; however, while I will show what I did, this is not a tutorial on how to use a multimeter, nor am I am expert. This blog (and my accompanying video) will show the testing I did to diagnose and solve the issue. If, after reading this, any of this seems too complicated or dangerous to you, please contact a local RV dealer or mobile tech for help.

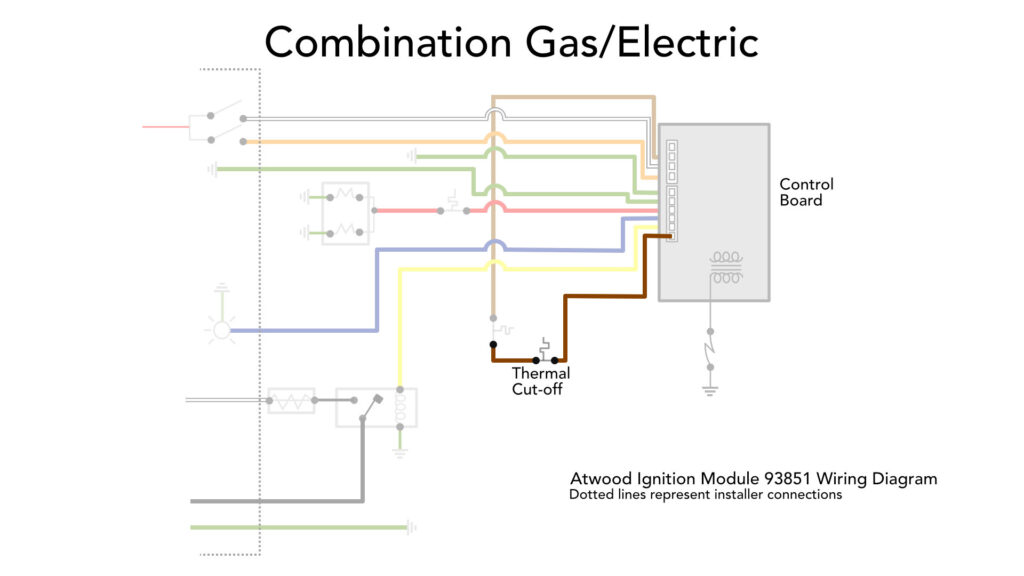
Water Heater Wiring Diagram
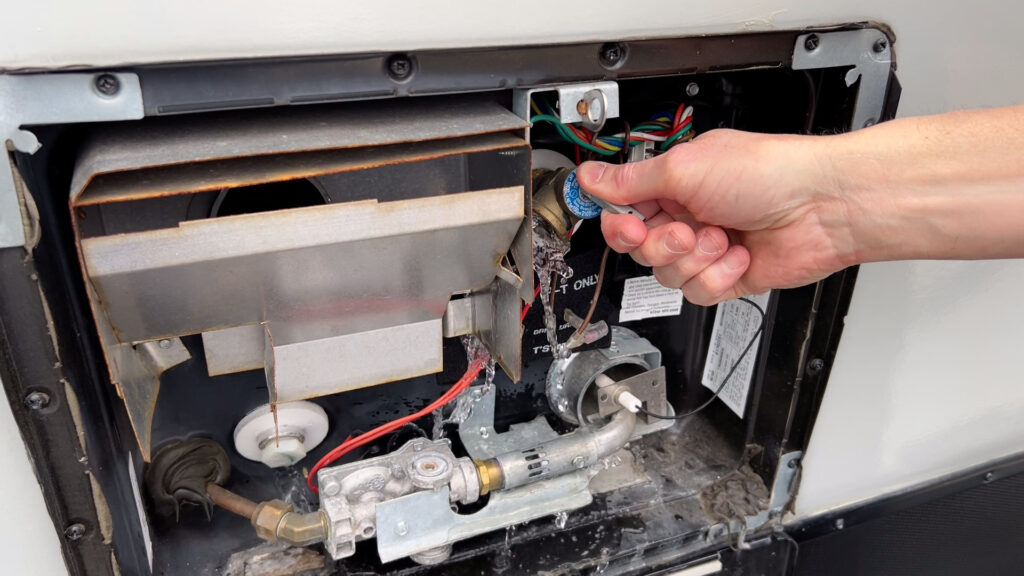
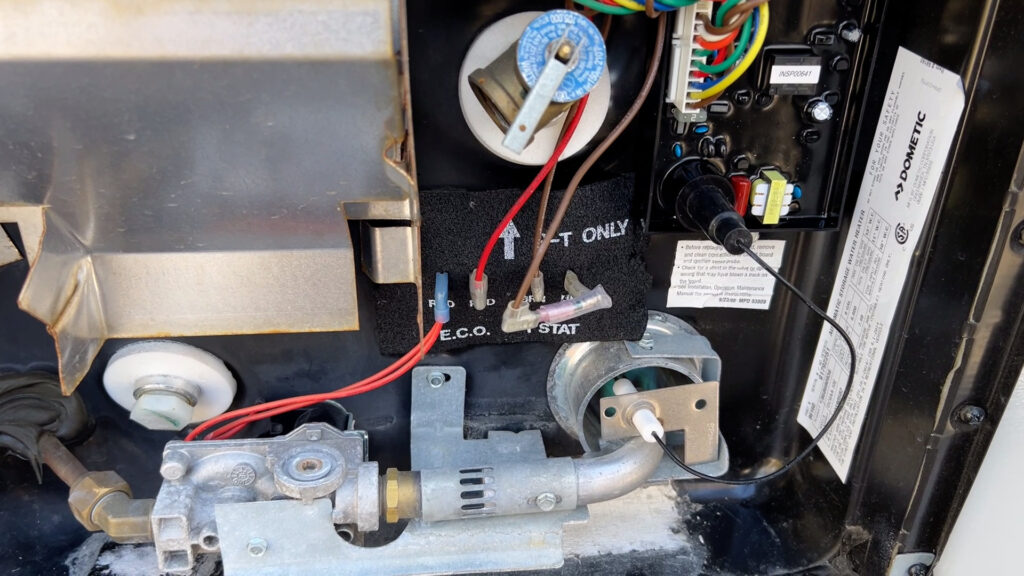
Before we get into what I did to troubleshoot my unit’s issue, let’s look at the wiring diagram for the Dometic GC6AA-10E water heater. Atwood has made this 6-gallon gas/electric unit for a long time, and Dometic purchased Atwood in September 2014[1].
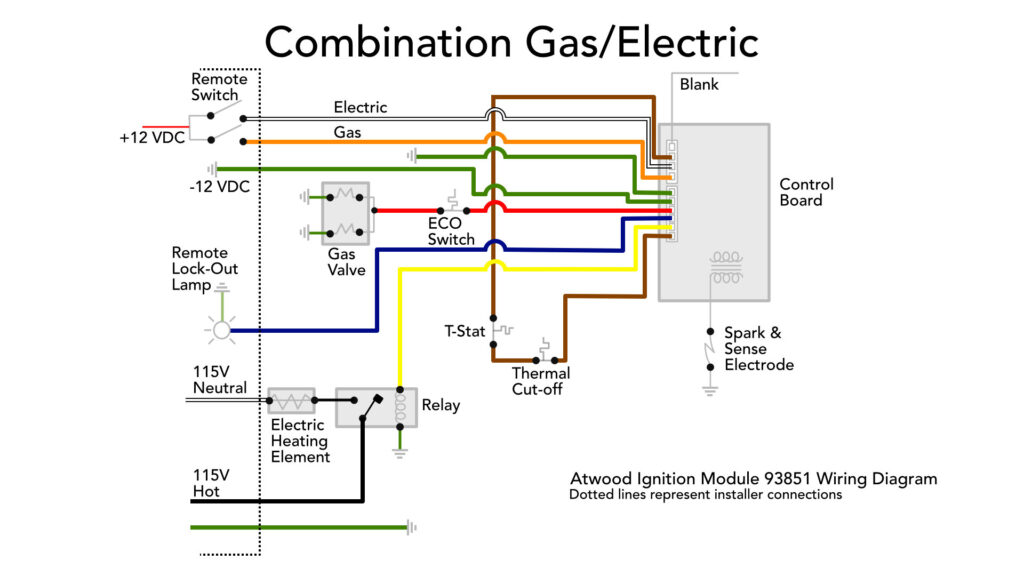
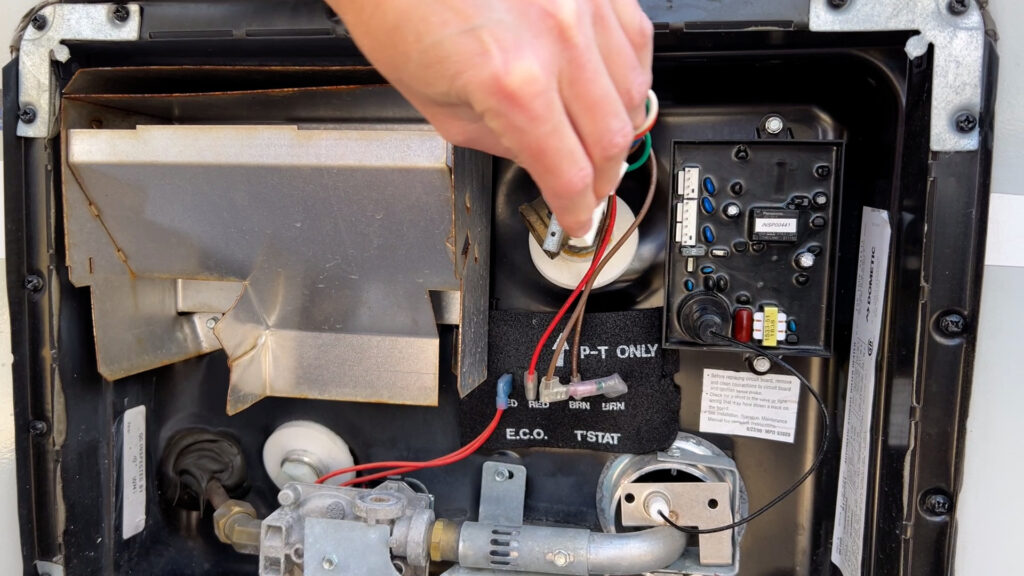
On the top left, you’ll notice that 12-volt power goes to the two switches (gas and electric) and then to the control board via a white wire for electric and an orange wire for gas. When either switch is turned on, 12-volt power should go from the rig’s battery through the fuse box to the switch and then to the control board. Next, a brown wire sends 12-volt power from the board to the Fixed-Temperature Thermostat (T-STAT). This module physically contacts the water tank and is set to break the 12-volt power flow when the tank water reaches 140 degrees. This effectively turns the power off to both the gas and electric processes when the water reaches full temperature.
A thermal cut-off fuse on this line is set to melt and break the connection as a backup if, for some reason, the unit overheats. The brown wire completes the circuit back to the control board after the Thermal Cut-Off fuse.
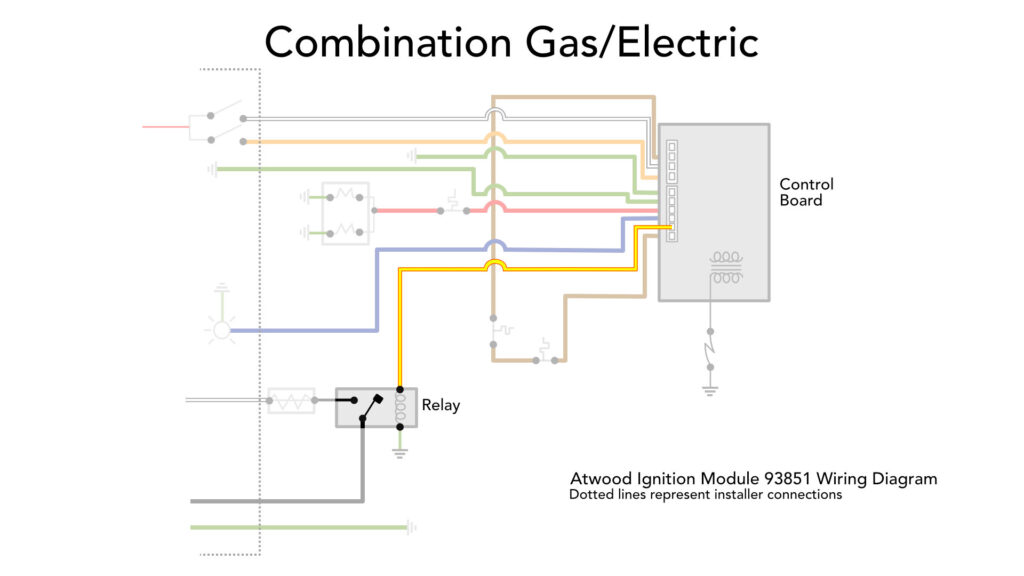
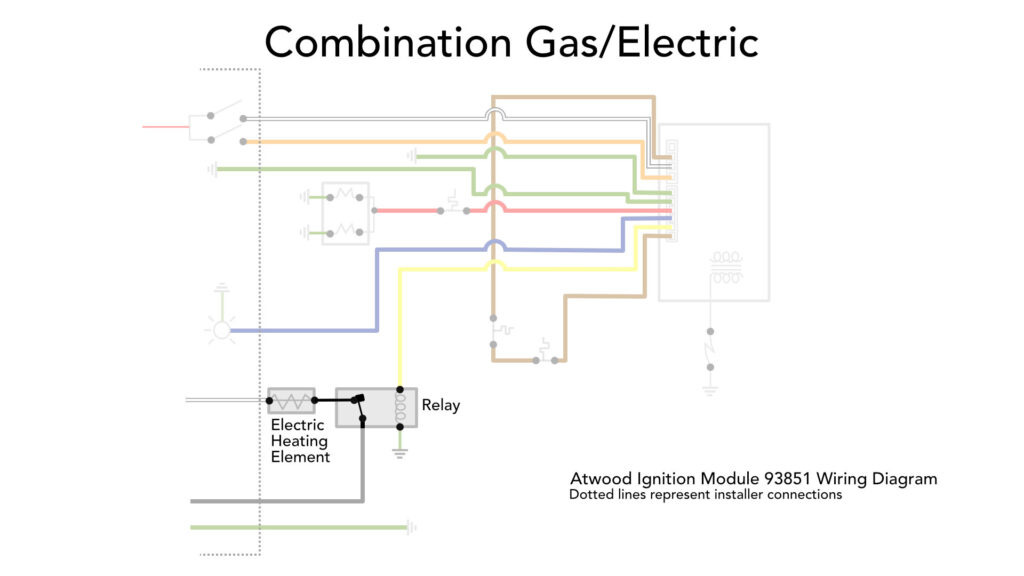
Let’s focus first on the electric side of the operation. It’s vital to understand the purpose of the yellow wire in this process. With the electric side switch turned on, this wire should send 12 volts to the electric heating element relay switch as long as the tank water is below 140 degrees. This current causes the relay to close, thus sending 115 volts from the AC side of the rig’s electric box to the water heater’s 115-volt electric heating element. If no or low voltage comes through the yellow wire, the relay will remain open, disconnecting the power to the electric heating element. If the electric-side switch is turned on, and the water temperature in the tank is less than 140 degrees, 12 volts should be present on this yellow wire, and 115 volts should be present at the heating element.
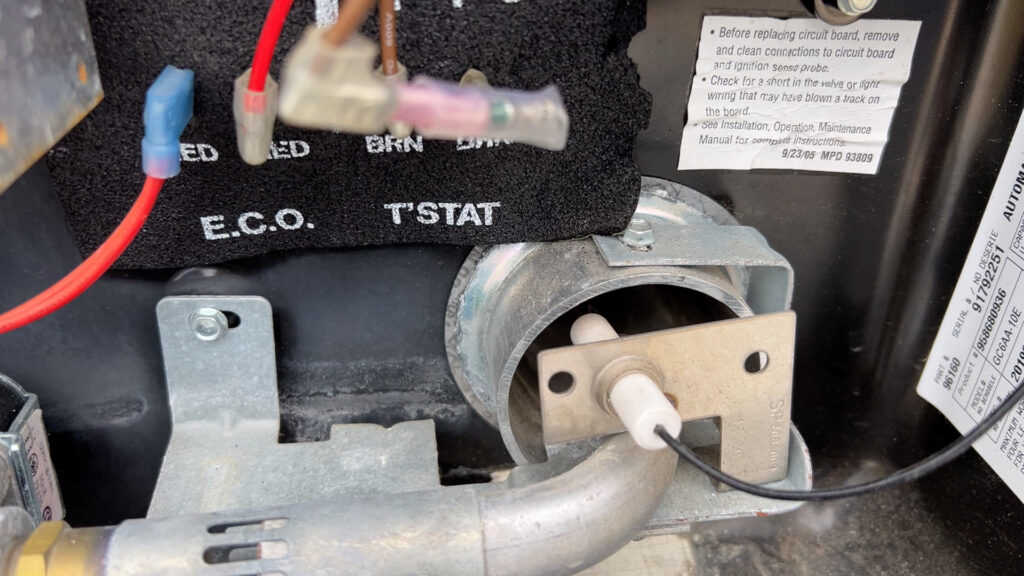
On the propane side of the operation, the red wire should send 12 volts to the ECO switch when the propane switch is turned on as long as the T-STAT and Thermal Cut-Off fuse are working (water temp is below 140 degrees). The ECO switch is like the T-STAT in that it physically touches the water tank and measures the temperature of the tank. It differs from the T-STAT in that it is set to break the flow of electricity if the tank reaches 180 degrees. This switch will only interrupt the electrical current if the tank gets hot.
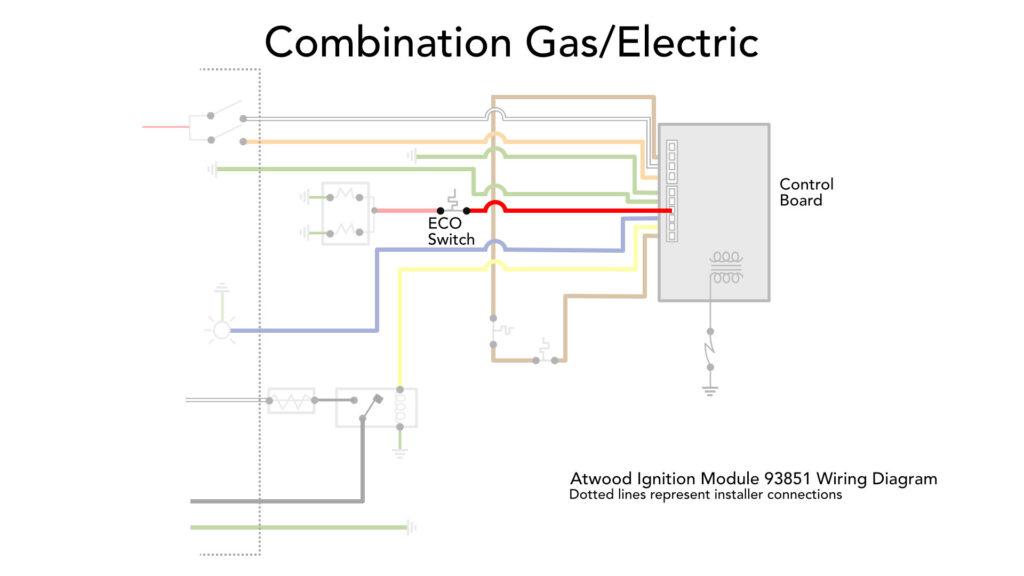

Suppose the ECO operates correctly and the water tank temperature is less than 180 degrees. In this case, the 12-volt current should flow to the propane gas valve and keep the valve open, allowing propane to flow through the valve’s small orifice for ignition. If the propane side doesn’t ignite, the blue wire will send a fault signal to the remote lockout lamp, indicating that it did not ignite. It does this after three separate attempts to ignite.
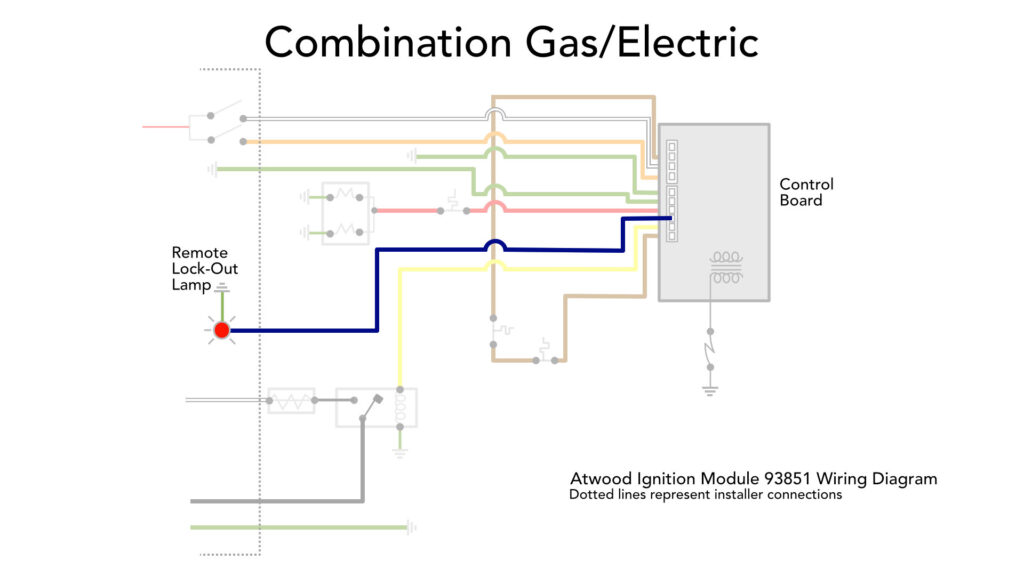
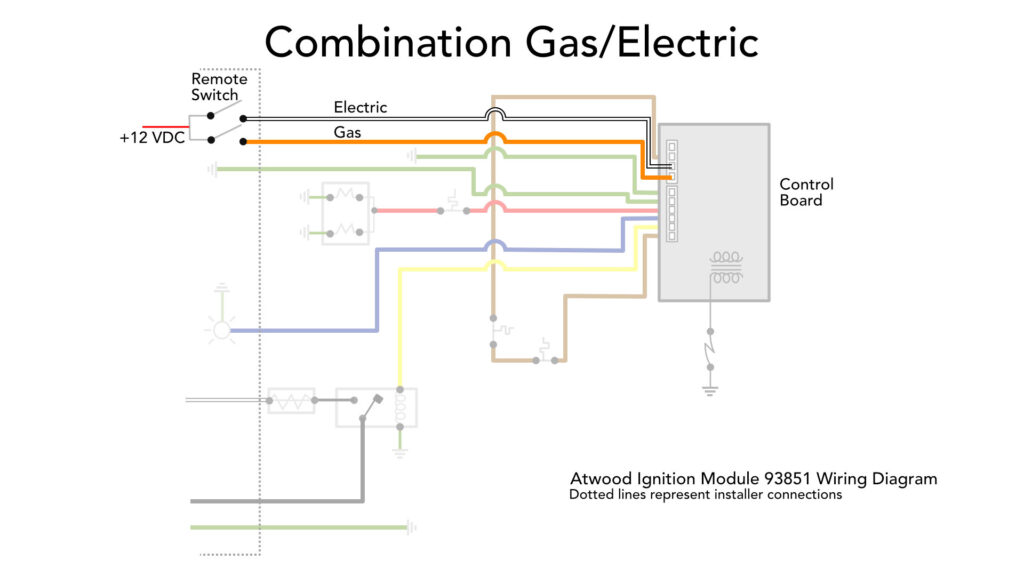
There is quite a bit to understand before getting started with troubleshooting, so feel free to study the details around the wiring diagram before proceeding. Understanding how the electrical process works is essential before troubleshooting the unit.
To troubleshoot, you will need a multimeter that can measure DC and AC voltage as well as continuity. I got a relatively inexpensive one at a local Harbor Freight.
We will try to be very methodical as we walk through the troubleshooting process. As a reminder, here are the symptoms: we had a clear electric spark at the ignitor when turning on the propane switch, but no propane igniting. It would try to ignite the three times and then fault. The heating element never came on to heat the water on the electric side. Also, we had working propane at the stove and furnace, eliminating the possibility of propane not being available.

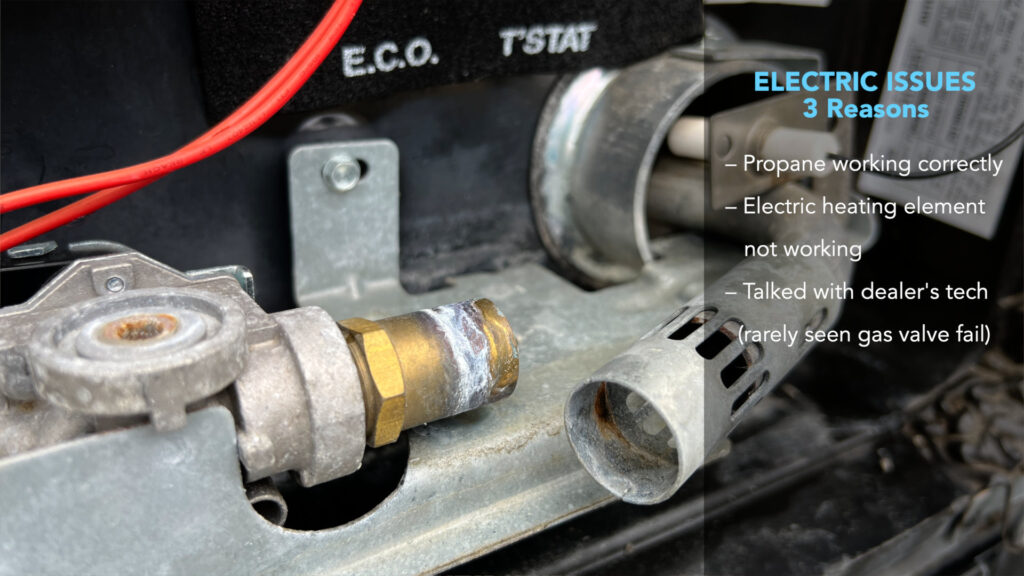
We decided to test the propane side first, and the Troubleshooting guide in the owner’s manual was helpful. There is a section that is labeled “Water Heater Lock Out – Spark Present but No Gas.” There are 12 potential causes presented, five having to do with some sort of restriction to the actual propane flow and seven having to do with electrical issues.

At this point, I decided to investigate the electrical issues for three reasons: first, we had propane working correctly in the rig; second, we had the concurrent issue of the electric heating element not working; and third, I talked to my dealer’s tech who said he had rarely seen a gas valve fail. He thought it was not a propane flow issue as long as the gas orifice and tube were not clogged – which I confirmed were not.
Testing
A reminder that you can watch this process on the corresponding video. Let’s go over the testing performed using the multimeter to eliminate potential causes on the propane side:
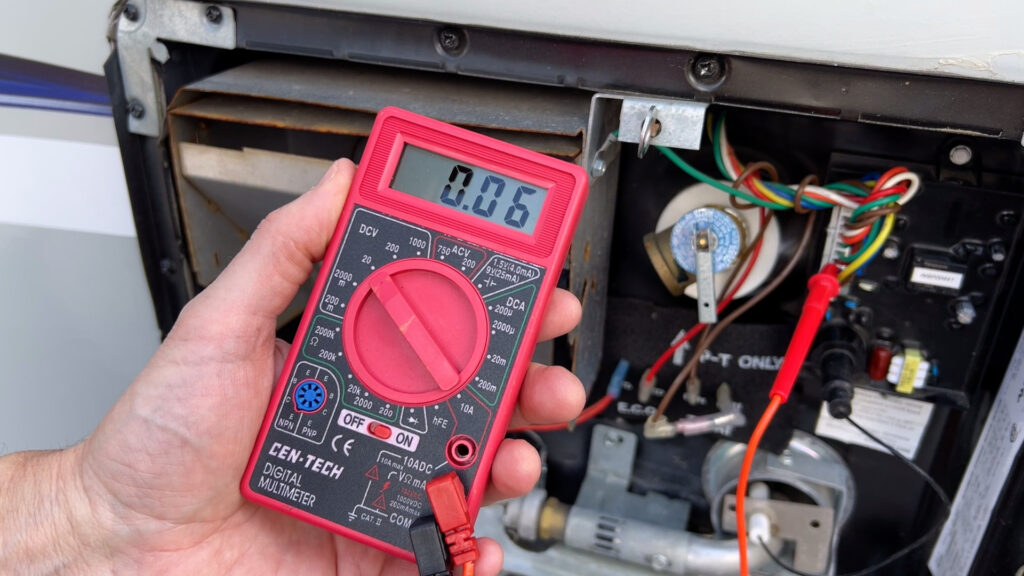
The first step is to check that 12-volt power is getting to the control board when the propane switch is turned on. Do this by setting the multimeter to DCV and putting the multimeter’s black lead to ground and the red lead inserted in the connection of the orange wire at the board. You should read at least 12 volts. Be aware that the owner’s manual dictates that a minimum of 10.5 DC volts is required for proper operation. If you are not seeing proper voltage, the propane switch may be bad, the 12-volt fuse in the electric panel may be bad, or your rig’s battery may be bad or require charging. In my case, we had 12.24 volts coming to the control board with the propane switch on.
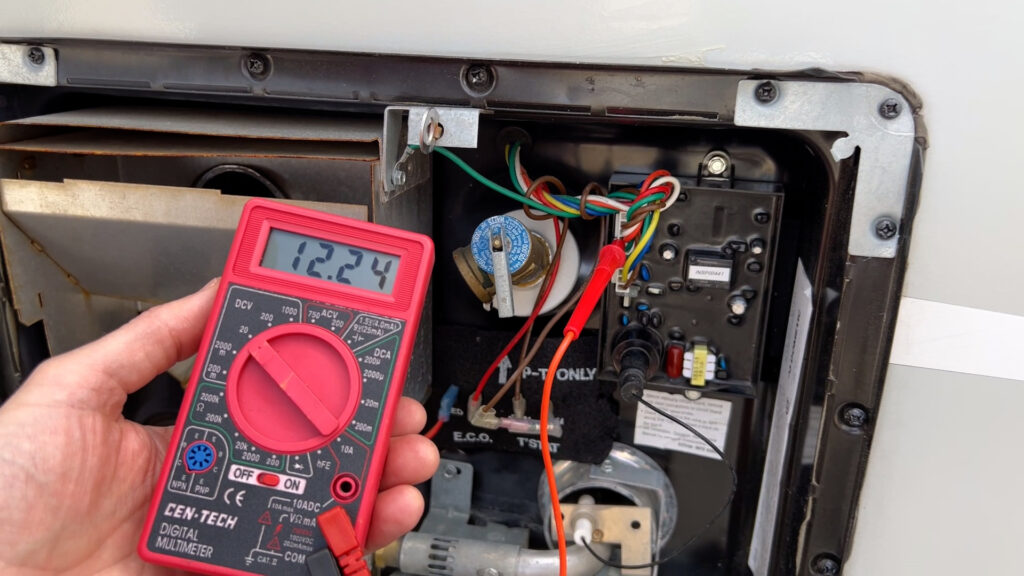
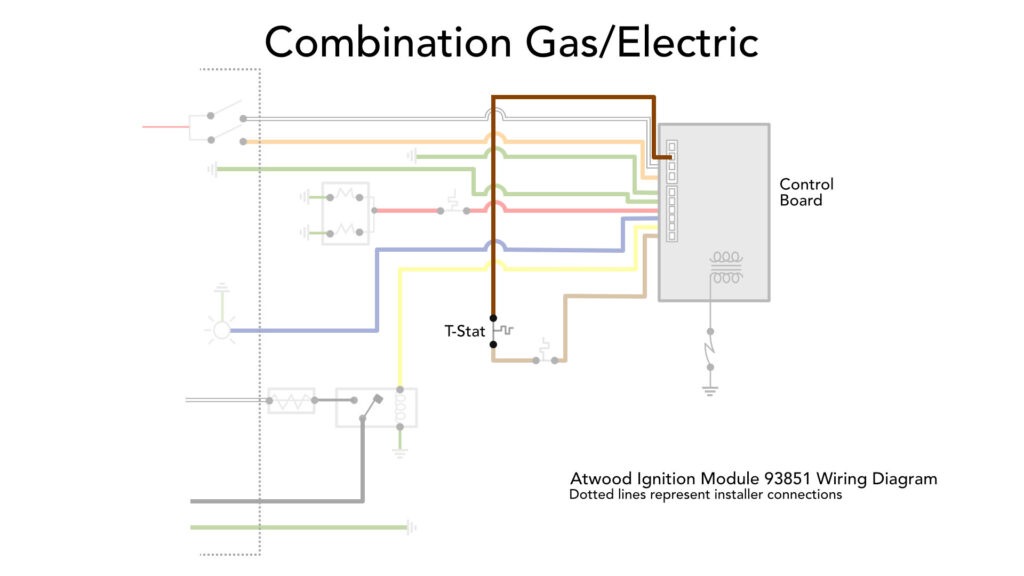
If this connection has proper voltage, the brown wire coming out of the board should also have proper voltage. To test this, keep the black ground lead from the multimeter touching ground, move the red lead, inserting it into the brown wire connection at the board. You should again read the proper voltage. In my case, it read 11.44 volts at the brown wire. Less than 12 volts, but enough to work.
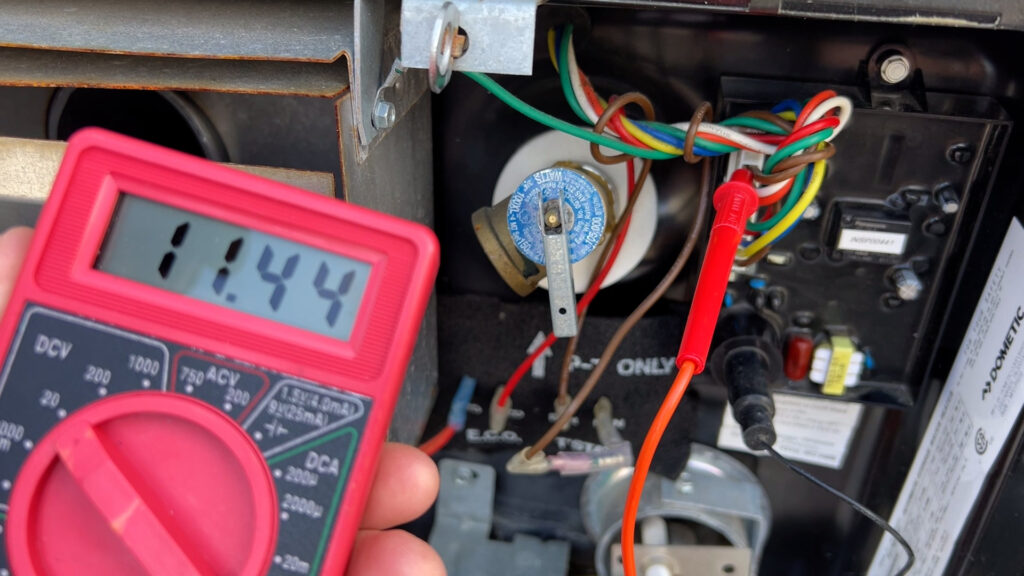
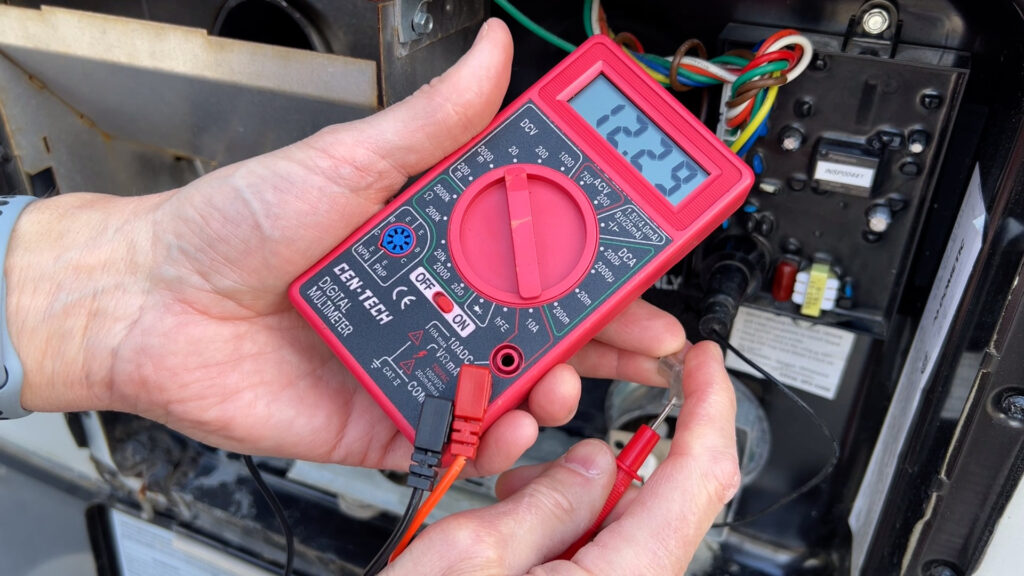
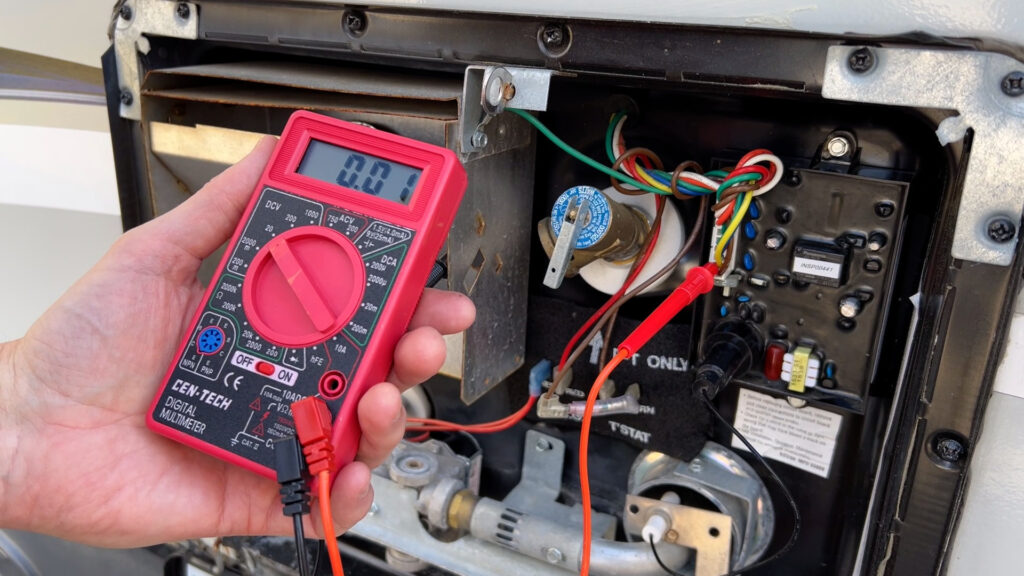
Next, follow the brown wire to its first stop, the T-Stat module, which cuts the power flow once the tank reaches 140 degrees. To test, again, leave the black lead touching ground. Remove the female connection on the brown wire at the T-Stat and insert the red lead of the multimeter. We tested and had 12.29 DC volts.
Next, reconnect the brown wire to the T-Stat and remove the Thermal cut-off fuse from the other side of the switch. Test the voltage passing through the T-Stat by touching the red lead of the multimeter to the module’s bare post. You should have proper voltage running through the unit (as long as the water temperature in the tank is below 140 degrees). We had 12.29 DC volts, so there was no problem at the T-Stat switch.
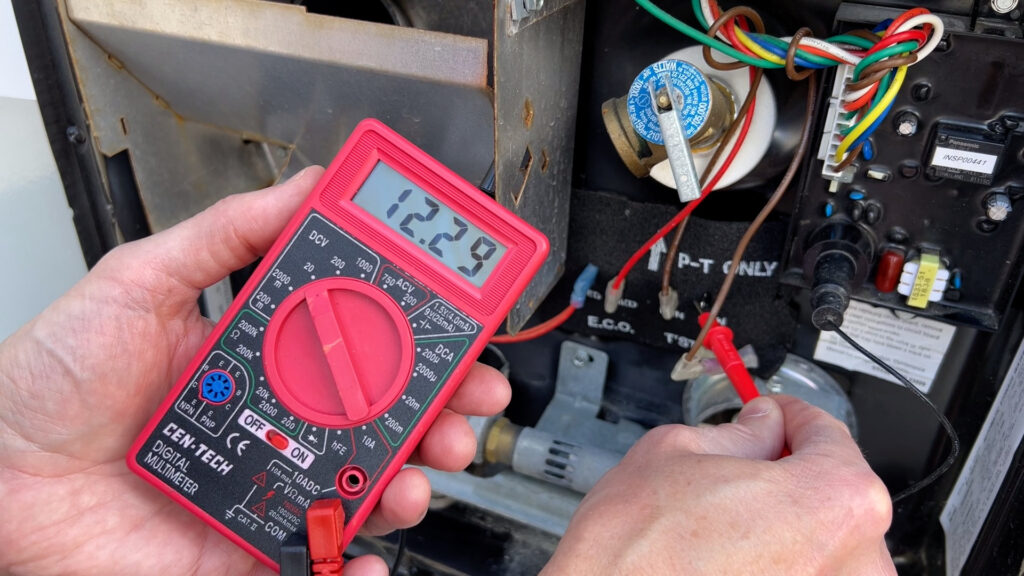
The next step is to test the Thermal cut-off fuse. Do the same test by having the Thermal cut-off fuse connected to the T-Stat module with power on. You should see the same voltage reading at the thermal cut-off fuse male connector. If not, the fuse itself may be damaged. We still read 12.29 DC volts. So, the fuse was fine.
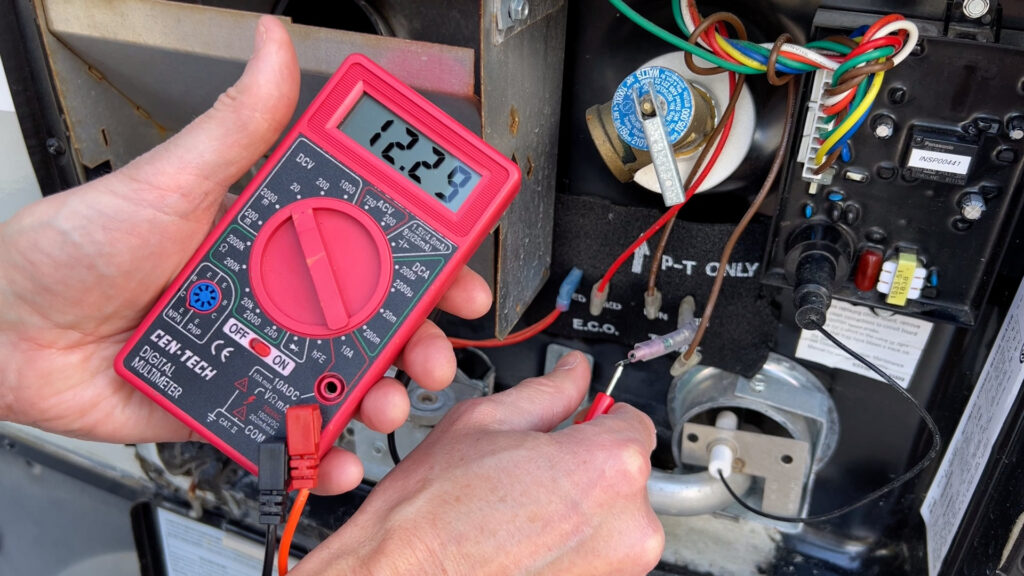
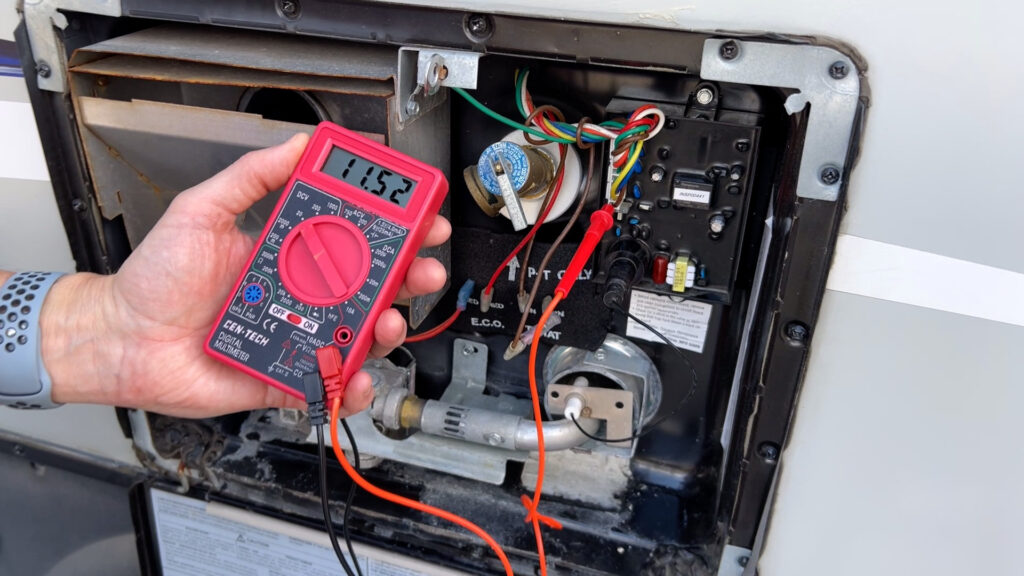
Next is to check the DC voltage returning to the board at the brown wire by inserting the red lead of the multimeter into the wire’s socket (always keeping the multimeter’s black lead to ground). You should again have proper DC voltage. If there isn’t proper voltage, you may have a loose connector or bad wire returning to the control board. If you do have proper DC voltage returning to the board, the issue is likely downstream. Here, we tested at 11.52 DC volts, so we still had a passing grade.
The next test for the propane side would be to check for 12-volt power at the red wire’s socket at the control board. This wire sends power to open the propane gas valve. Insert the red lead from the multimeter into the red wire’s connection at the wiring harness. There should be at least 10.5 volts at this socket, powering the red wire at the control board. As you can see, this test failed, showing erratic readings and coming in below the needed 10.5 DC volts of steady current for some reason.
This meant that enough voltage was getting to the control board but not coming out of the control board to the red wire that feeds power to the ECO module and gas valve. This almost certainly meant that the control board had somehow failed. Since the gas valve requires at least 10.5 DC volts to operate, the gas valve would not open given low voltage.
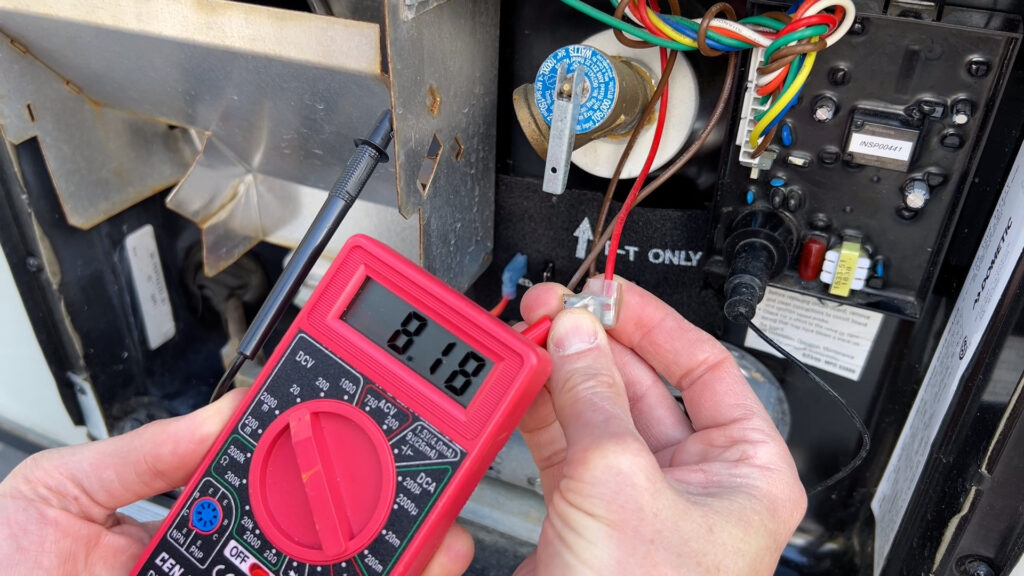
When testing the red wire at the ECO switch, we had a steady 8.18 DC volts, well below the necessary 10.5 DC volts to open the propane gas valve. We also test at the exit of the ECO switch and had 8.19 DC volts. This showed that the current was passing through the ECO switch properly but was insufficient to open the gas valve. All this pointed to the control board as the issue.
This could also explain the concurrent problem with the electric heating element not working. It was easy to test this by turning on the electric switch inside the rig and testing that power was arriving at the control board but not going out through the yellow wire that controls the electric heating element relay switch. By testing this, we had no current getting to the yellow wire at the board.
Given that the red wire for propane valve operation and the yellow wire for the electric relay switch were putting out less than the required DC voltage, we decided to replace the control board, as this seemed to be where the problem was located. In gas and electric operations, sufficient DC voltage was getting to the control board after the T-Stat and Thermal Cut-Off fuse but not exiting to the red and yellow wires that control the gas valve and electric heating element operations, respectively.
Installing the New Control Board
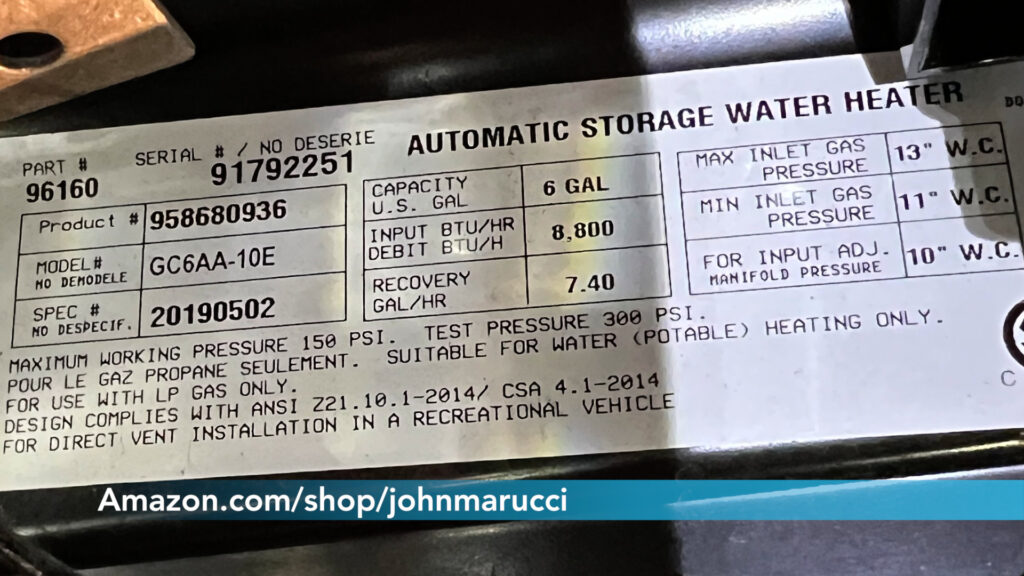
You should research and purchase the correct control board for your water heater model. We used the product sticker on the inside of the water heater cover to identify the model number and associated part required. The well-rated replacement control board we needed was over $100 on Amazon (as of the making of this publication date). I ordered it and it arrived the next day.
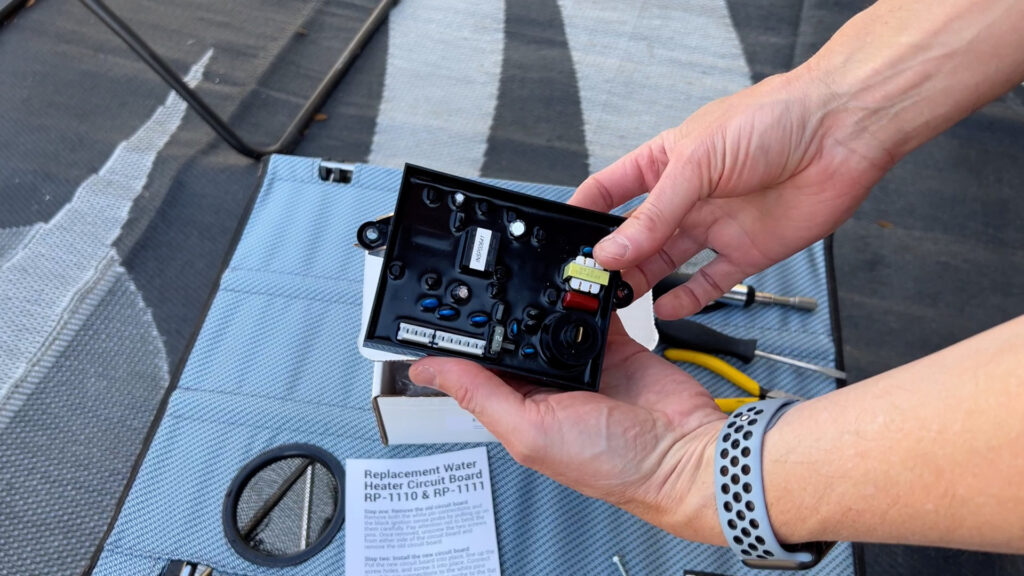
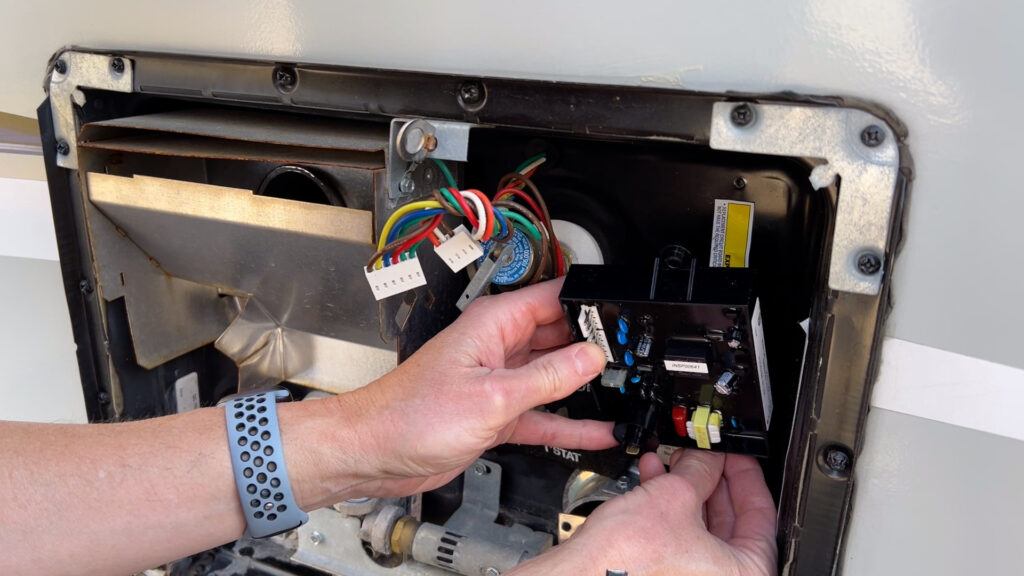
Replacing the control board was relatively easy. Here are the steps to remove the defective control board:
First, ensure all power to the existing control board is turned off at the switches.
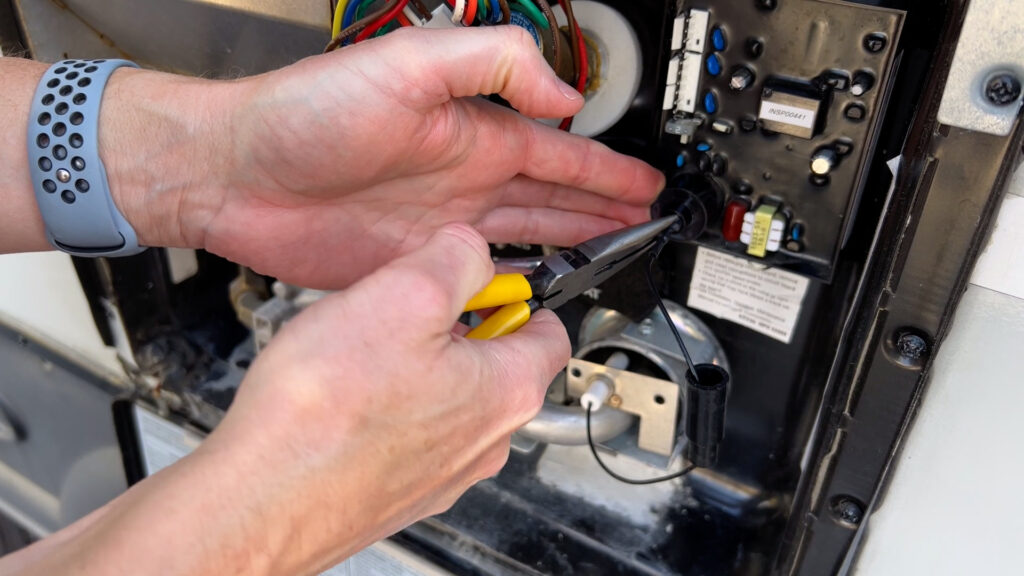
Next, disconnect the two wiring harnesses.
Next, disconnect the ignitor wire from the board.
Next, unscrew the control board’s two mounting screws and remove the board.
To install the new control board, reverse the above process:
First, install the board with the two mounting screws.
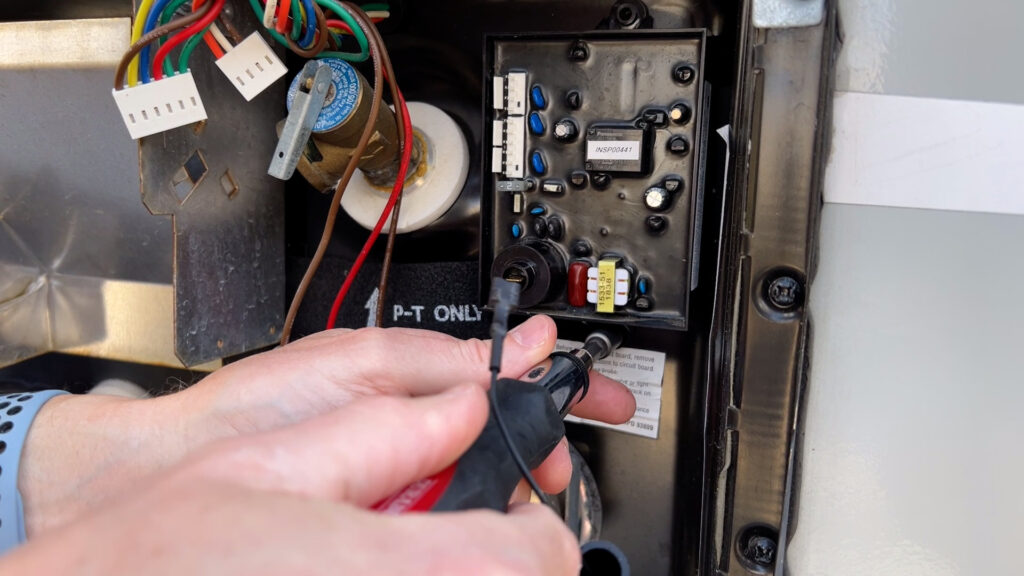
Next, attach the ignitor wire to the board.

Next, attach the two wiring harnesses.

We did have a bit of an issue when reconnecting the two wiring harnesses. After connecting the top harness, the bottom harness was a bit difficult to get seated properly. The solution was to remove both harnesses, seat the bottom harness first, then seat the top harness. The plastic tabs should seat fully to indicate the harnesses are correctly connected.
Testing
After installing the new control board, we need to test the system:
First, turn on the propane switch inside the cabin.
Next, go outside and look for the igniter to spark and the propane to ignite. It may take a few times as air is bled from the propane line. If it does ignite, you know that DC current is correctly passing through the red wire and keeping the gas valve open. In my case, the propane ignited almost immediately.
Next, turn the electric switch on inside the cabin to test the electrical side. DC current should close the electric relay switch, allowing 115 volts at the electric heating element.
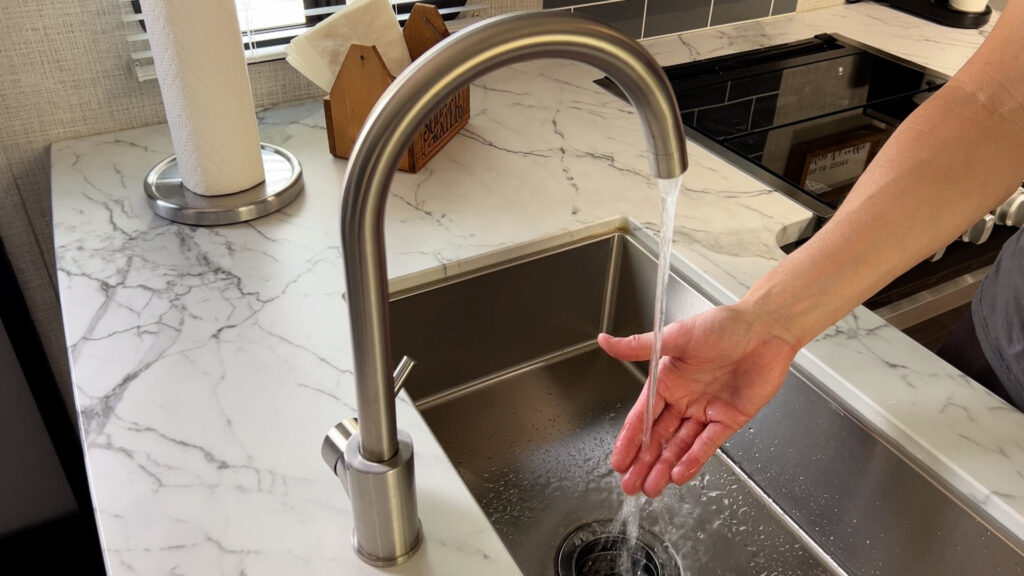
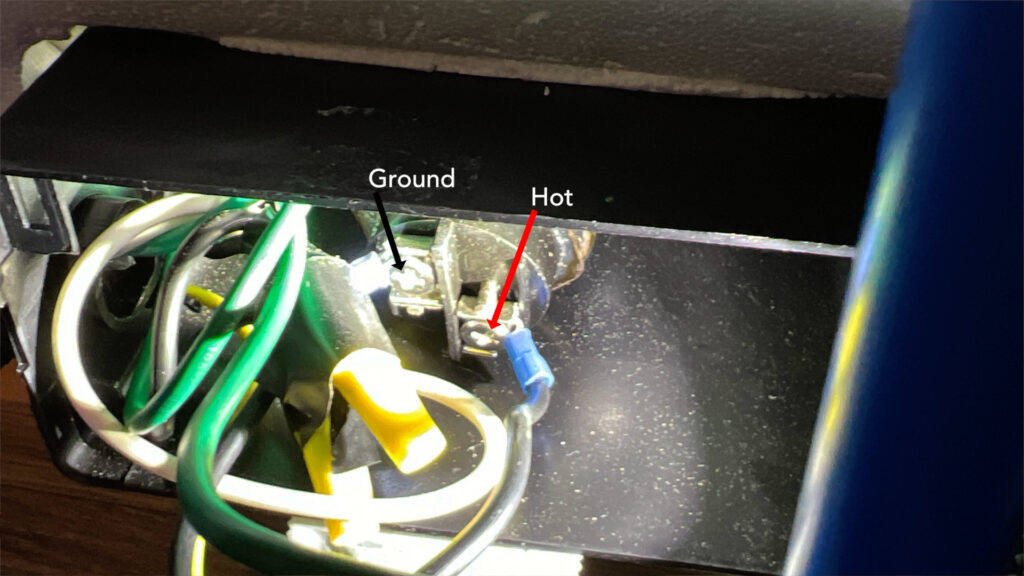
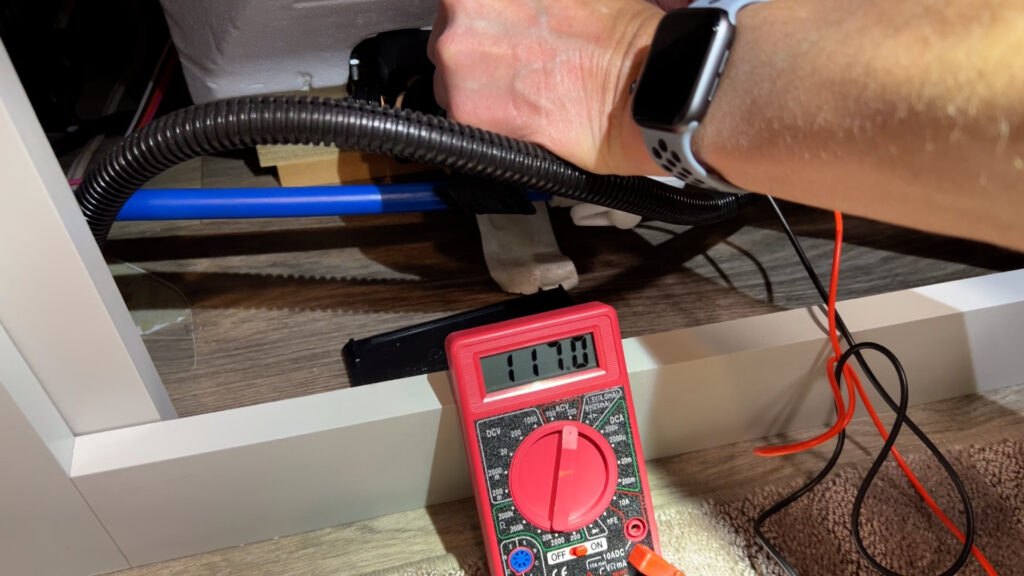
You can test for 115 volts at the electric heating element by locating the heating element and testing for AC voltage at the heating element’s AC wiring input. Be very careful, as this is a much higher voltage. First, turn the breaker off to the water heater at your electric panel. Locate and remove the relay switch cover to access the area. You can test for 115-volt AC current by changing the multimeter to ACV, very carefully grounding the black lead of your multimeter, and putting the red lead to the hot side of the heating element. This should be a larger diameter black wire. Turn on the breaker to the water heater and test for proper voltage at the heating element. We did this and had about 117 volts. So, everything was working correctly again! Remember to turn the breaker back off and correctly reassemble the relay switch before turning the breaker back on for service.
Hopefully, this was helpful for you to understand better how to troubleshoot a common water heater problem. Besides showing what I did, my hope is that this will let you see if this is something you may want to tackle yourself or if you should contact a local dealer or RV tech for help. Remember, you are dealing with live electricity, so please be very careful if you decide to do this type of work yourself.
That should do it. All the best in your camping adventures!
As always, thanks to our fans who support our efforts by starting their shopping from our Amazon Storefront and their generous financial support by using the THANKS feature located under each YouTube video ($ within the Heart icon). Your support is greatly appreciated!
https://www.prnewswire.com/news-releases/dometic-group-signs-purchase-agreement-with-atwood-mobile-products-llc-274453381.html ↑