
This blog will cover the latest RV and travel data news. June 2023 RV production numbers are out, and we’ll cover the latest data so you can better gauge if it’s time to buy, sell or hold an RV. There is also news about a new 10-year RV warranty. Later in the newscast and I have commentary on RV quality and my experience of owning then selling a new 2022 travel trailer. We’ll get into this and more.
RVIA Numbers
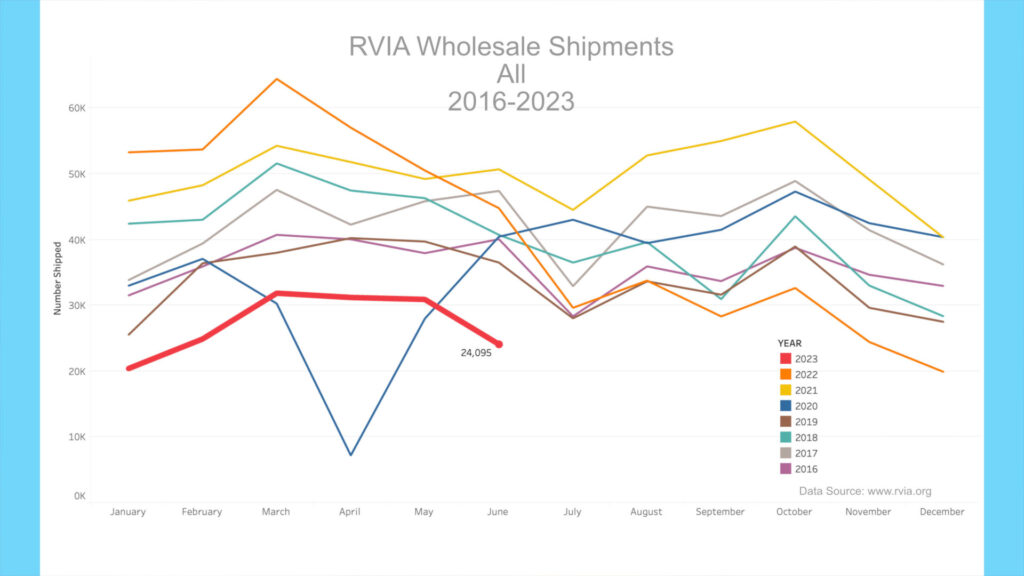
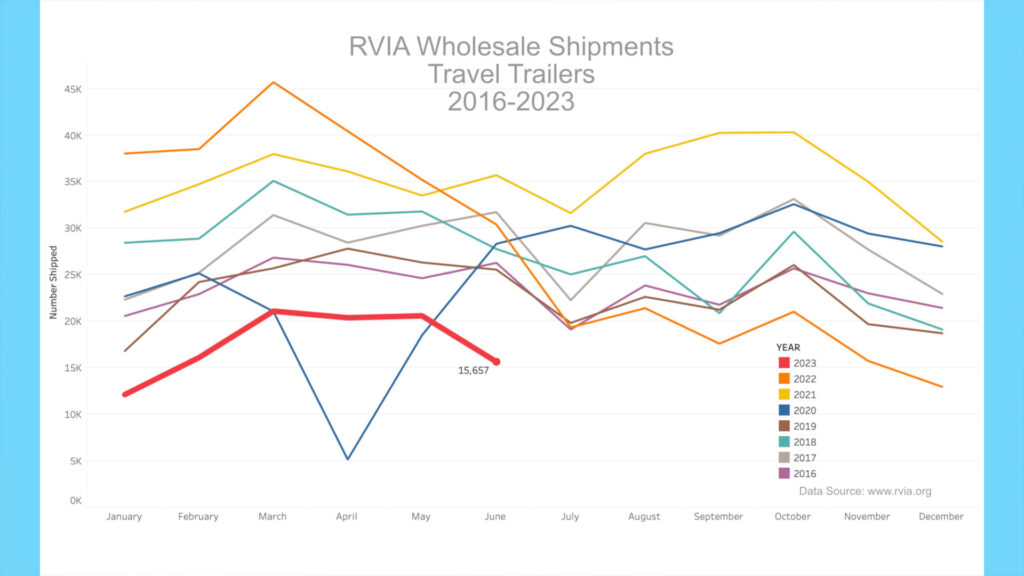
On July 25th, 2023, the RVIA posted the latest RV wholesale shipment data for June 2023. Production numbers continue a downward trend compared to the prior month and are significantly down year-over-year, as expected. Only 24,095 total RVs were shipped in June, compared to 44,793 in June 2022, down about 46% year-over-year. Travel trailers witnessed a significant decline, with only 15,657 shipped in June vs. 30,409 a year ago, about a 48 percent decline. It was by far the worst June for towable trailer shipments in recent memory with almost 10,000 fewer travel trailers shipped than in the next lowest month, June of 2019.
RV Trader Numbers
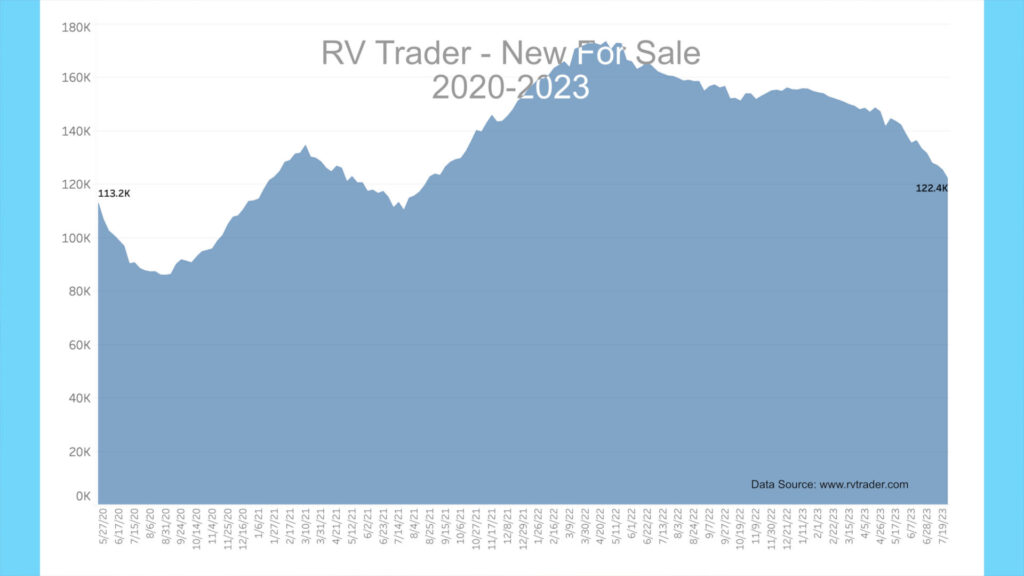
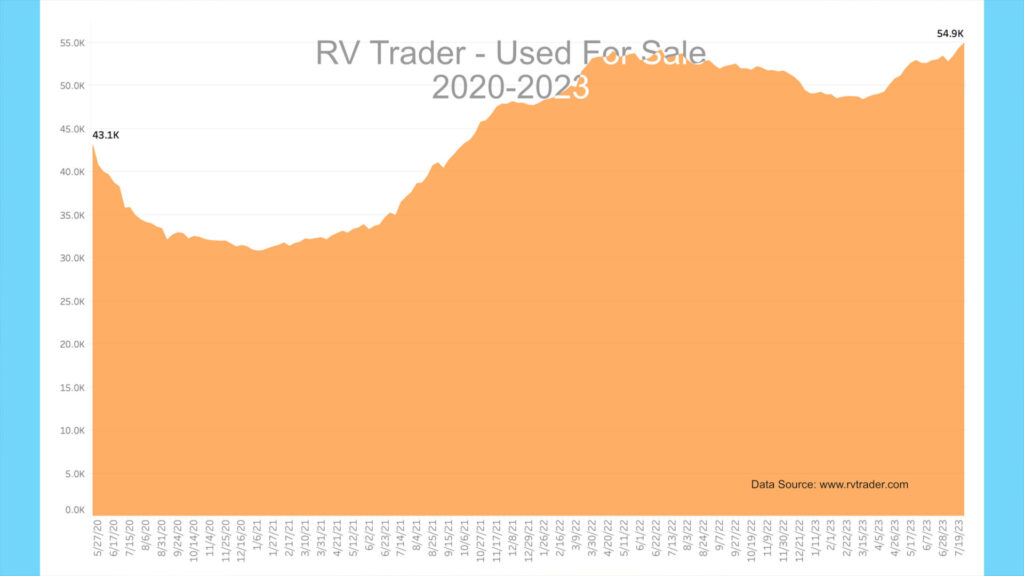
Meanwhile, RVs for sale on RVTrader.com continue a steady decline, with new units seeing a substantial decline since last month and used units for sale continuing to increase. This points to significant discounts on new units that are crowding out the sale of used units. There were 122,369 new RVs for sale as of July 26th. This is down about 9,300 units from late June’s 131,676 and down approximately 38,000 new units versus late July 2022.
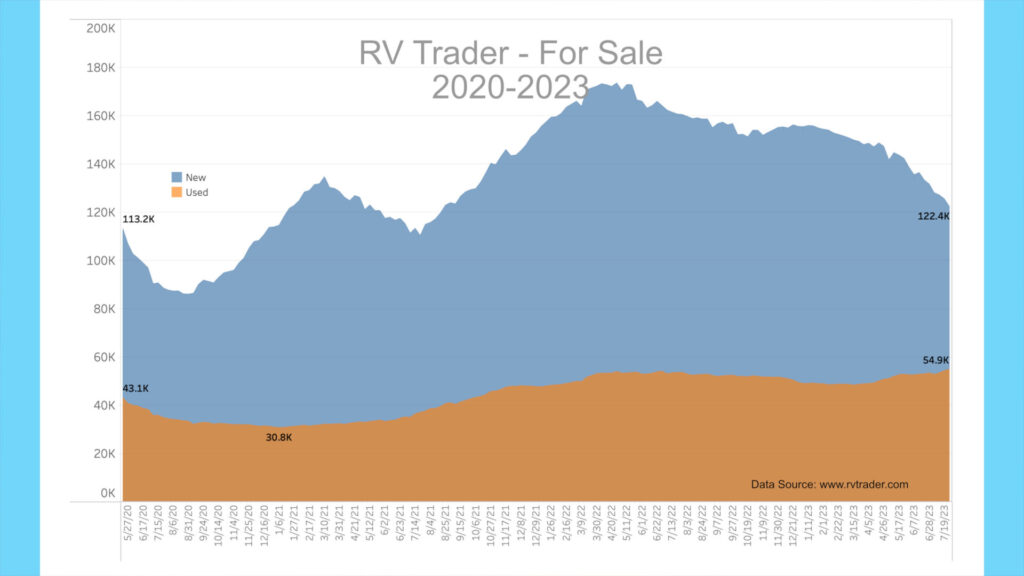
Used units for sale increased by about 1,500 to 54,907, up from 53,424 last month, as more people attempt to unload used RVs. This is now the fifteenth week in a row with used for-sale units above 50,000. This time last year, the number of used RVs for sale was 53,677, so we have about 1,200 more used units for sale versus late July 2022. Given that new unit pricing has been significantly discounted, the swing to purchasing new vs. used has moved greatly toward the new market. We have heard of discounts of over 40% from MSRP on some new units as dealers desire to clear older inventory.
Model Year Trends
We are introducing a chart to the data review that covers new trailers for sale by year from RVTrader.com. This is so you can see the volume of new trailers by year, which is especially important when shopping. If you know, for example, that there are still a large number of 2022 models for sale while 2024s are being delivered (which is the current situation), you can then negotiate more aggressively for new 2022 models.
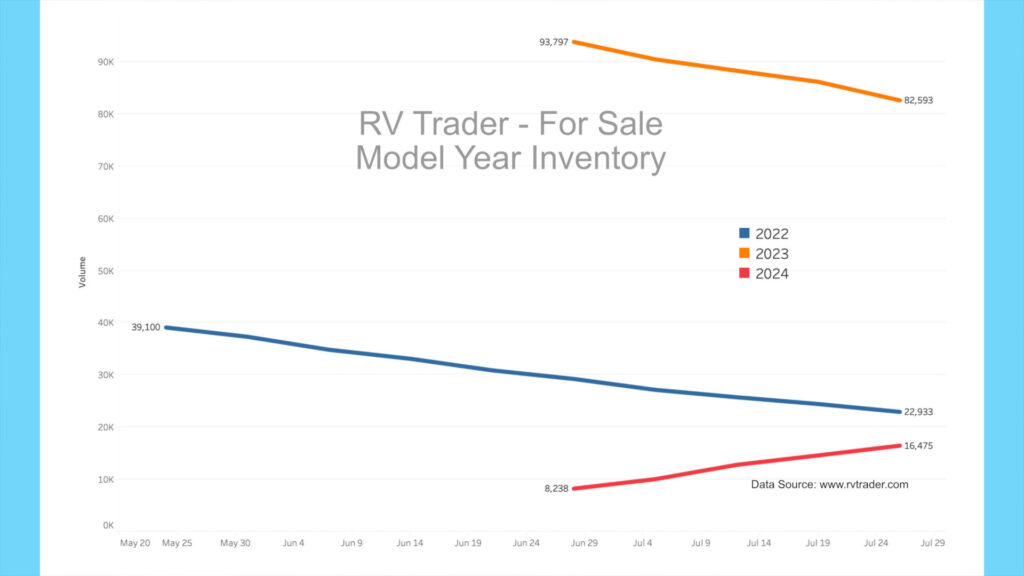
In the new chart, the blue line shows new 2022 model volumes for the past ten weeks. The number of new 2022 models has decreased from 39,100 to 22,933 units as dealers unload older units. The orange line shows 2023 models for the past five weeks going from 93,797 to 82,593 units. Meanwhile, the red line toward the bottom of the chart shows 2024 models now showing up on RVTrader.com. Five weeks ago there were 8,238 new 2024s, and now there are 16,475. As a reminder, many but not all dealers advertise on RVTrader.com to sell inventory. It remains an excellent proxy for overall dealer inventory.
BLS RV Manufacturing Labor Stats
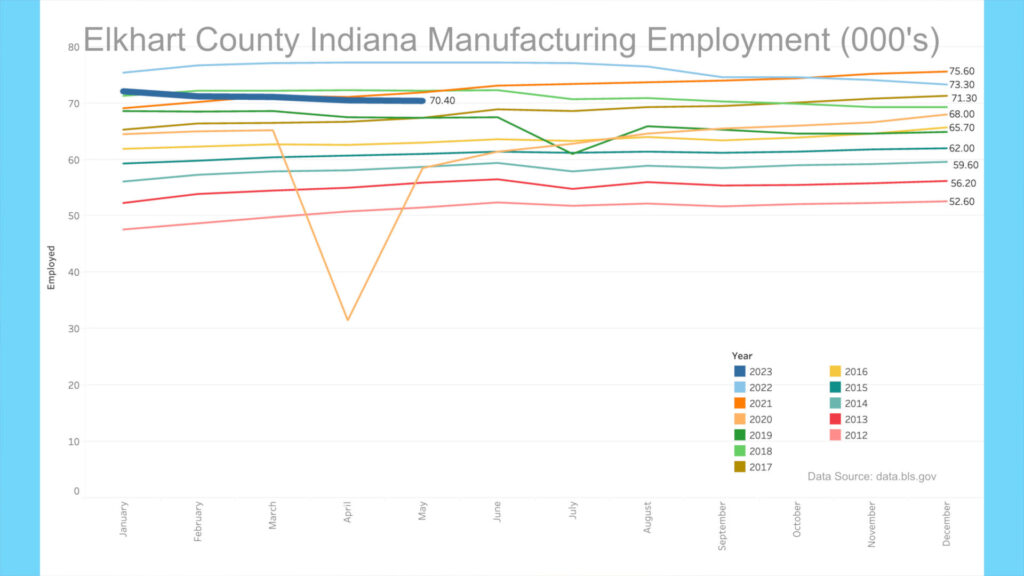
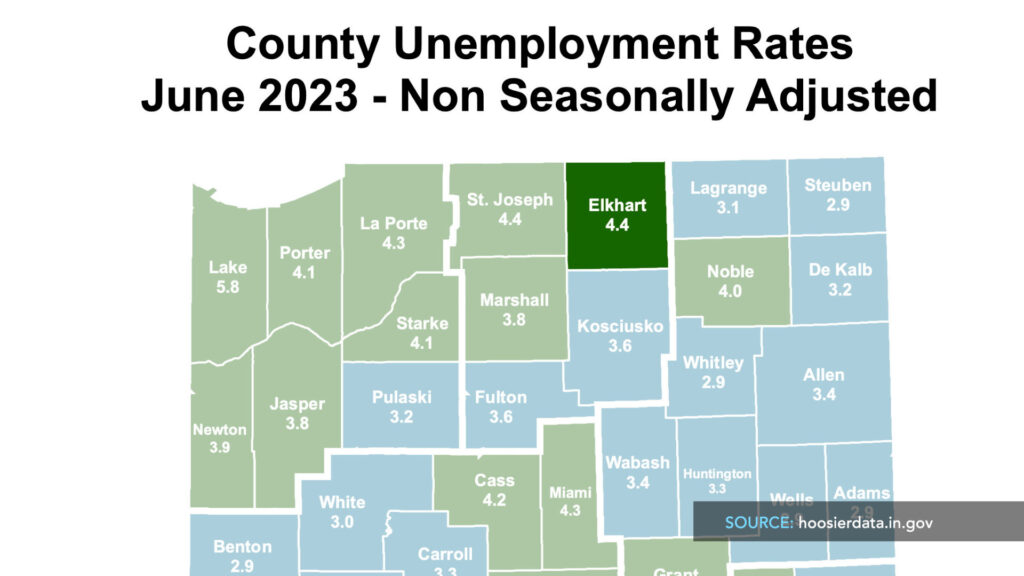
The Bureau of Labor Statistics has revised Elkhart County, Indiana’s latest manufacturing employment data for May 2023. We cover this because a very high percentage of North American RVs are made in this area of the country. The revision shows that at the height of production last April through June of 2022, there were 77,200 people employed in manufacturing. For May 2023, this number stands at 70,400 people, down 6,800 since the peak. The employment number will likely sink further going into the fall as manufacturers and suppliers lay off employees given the current demand shortfall. Accordingly, the unemployment rate for Elkhart based on June preliminary numbers has risen to 4.4% from 3.7% in May.
High-End Market
For the high-end market, inventory levels for Colonial Airstream in Millstone Township, New Jersey, one of the nation’s largest Airstream dealers, continue to move towards a buyer’s market with in-stock units remaining high.
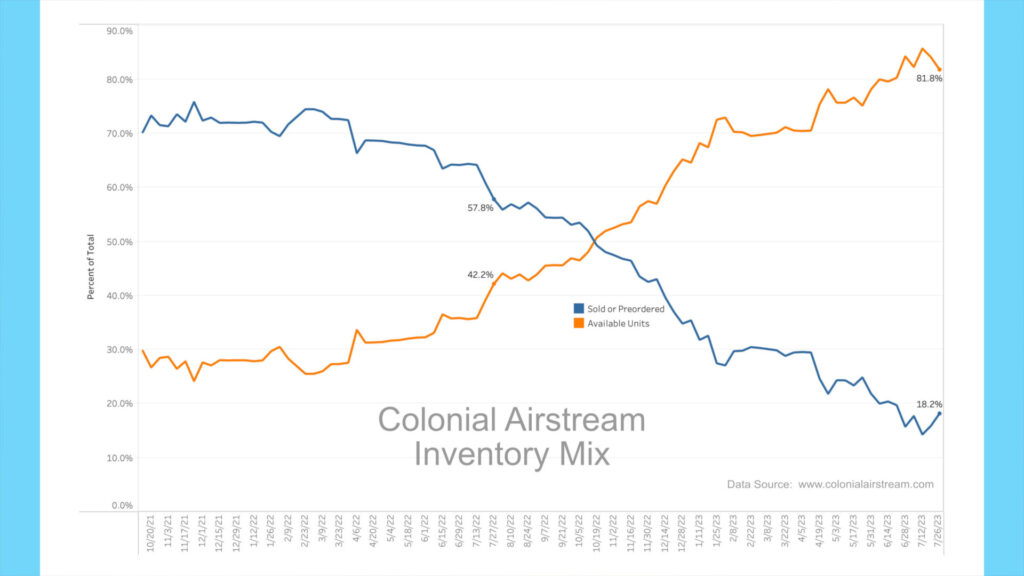
About a year ago, roughly 58% of Colonial’s inventory was preordered, meaning only 42 percent of their Airstream inventory was either on the lot for sale or being delivered and available. As of July 26th, 2023, roughly 82% of inventory is available for sale, with only 18% spoken for. The problem is that MSRPs have risen considerably in the past few years, so even discounted, these units can be very pricy. Also, the mix of units available looks to be higher trim levels, meaning higher prices.
AAA
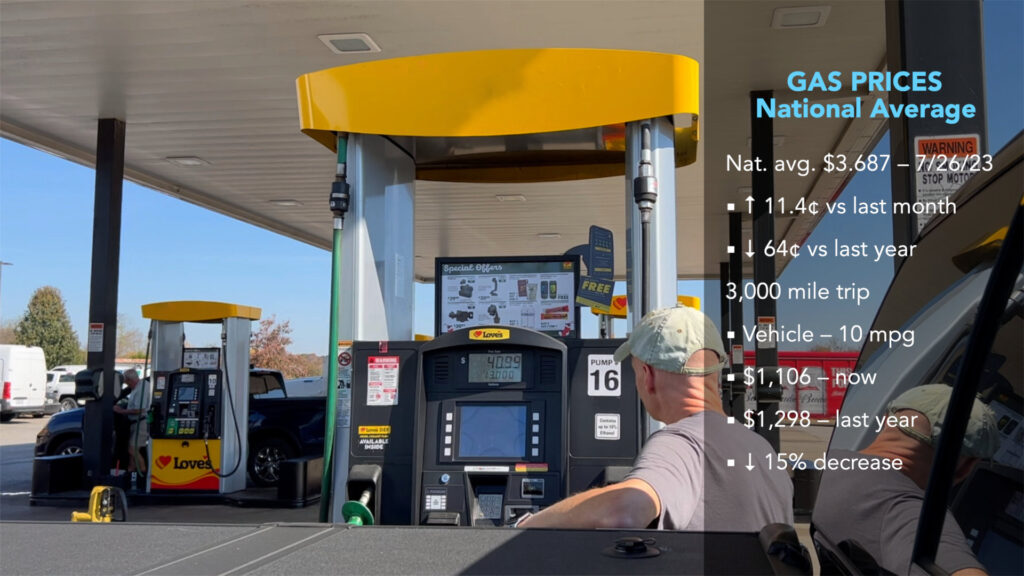
Gas prices have increased in the past month. According to AAA, the current average nationwide price as of July 26th was $3.687 per gallon for regular unleaded, up $.114 from a month ago and down $.64 per gallon from a year ago. An RV trip of 3,000 miles at 10 mpg would cost $1,106 now vs. $1,298 a year ago, about a 15% decrease YoY. Diesel prices have steadied below the $4 mark and now sit at $3.921, up $.045 from a month ago and down $1.47 from a year ago. A similar 3,000-mile trip getting 15 mpg would cost $784 now vs. $1,077 a year ago, a 27.0% decrease.

ATC Warranty
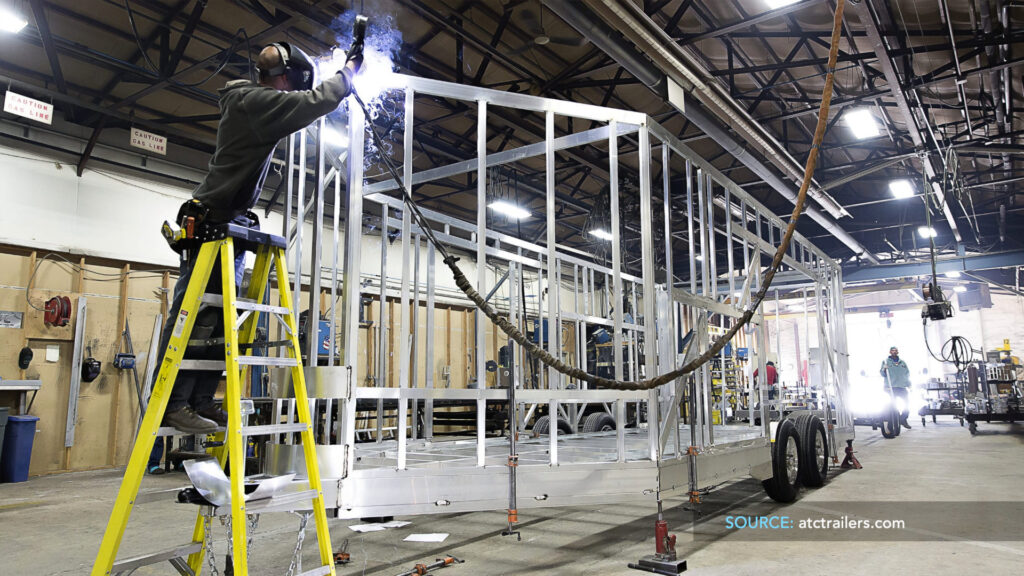
It’s remarkable to see an RV manufacturer increase their structural warranty. ATC has recently announced an increase to its structural warranty to 10 years for its 2024 Plā 700 Series trailers as well as to some existing models. If you are not familiar, ATC makes higher-end trailers with aluminum structures. We toured a couple of them when we were at the Tampa RV show last January. ATC trailers are full-perimeter, six-sided integrated aluminum frames with fully welded all-tube aluminum construction. Link to ATC PLA 700 video tour.
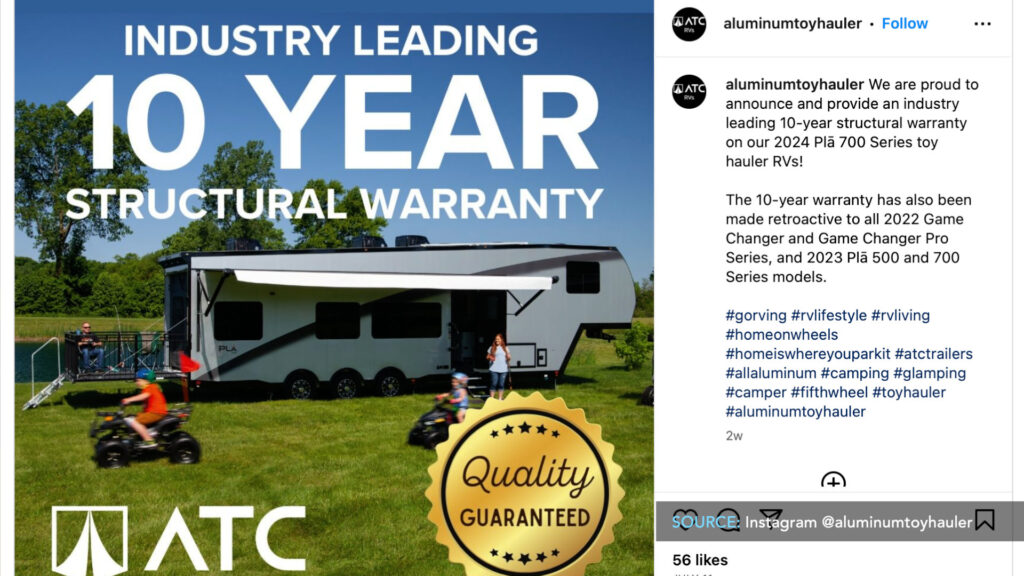
According to the warranty information on the ATC website[1], the 2024 Plā 700 Series and 2022/2023 Plā 500 & 700 Series, as well as the 2022/2023 Game Changer/PRO Series trailers are included in the new 10-year structural warranty. For prior year models just mentioned, this is up from 5 years. Duane Yoder, the CEO at ATC, commented, “We can make no stronger statement about the quality construction of our RVs than providing our customers a warranty that hands down, leads the towable RV industry. ATC stands behind its RVs, the day they come off the assembly line and for many years after.”[2]
Quality Concerns Continue
This brings me to the continuation of an ongoing complaint about RV quality. If you listen to the RVIA or industry insiders, you would think that the current downturn in RV production is only because of interest rates and inflation. There is almost no acknowledgment that the industry has a very real quality problem and that this major factor is playing a part in the downturn.
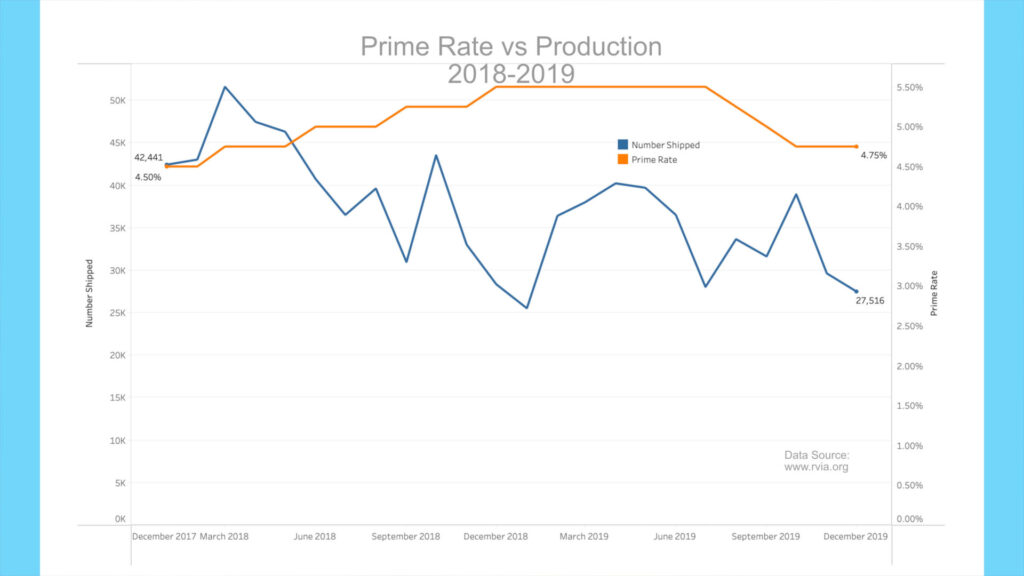
If you look back with me at production trends prior to the pandemic, there were about 20 months of diminishing production, and this was during a time of moderate interest rates. The latter part of 2018 and all of 2019 was a bleak time for RV production with manufacturing employment declining. The pandemic saved a declining industry as people chose RVing as a temporary way to travel and vacation.
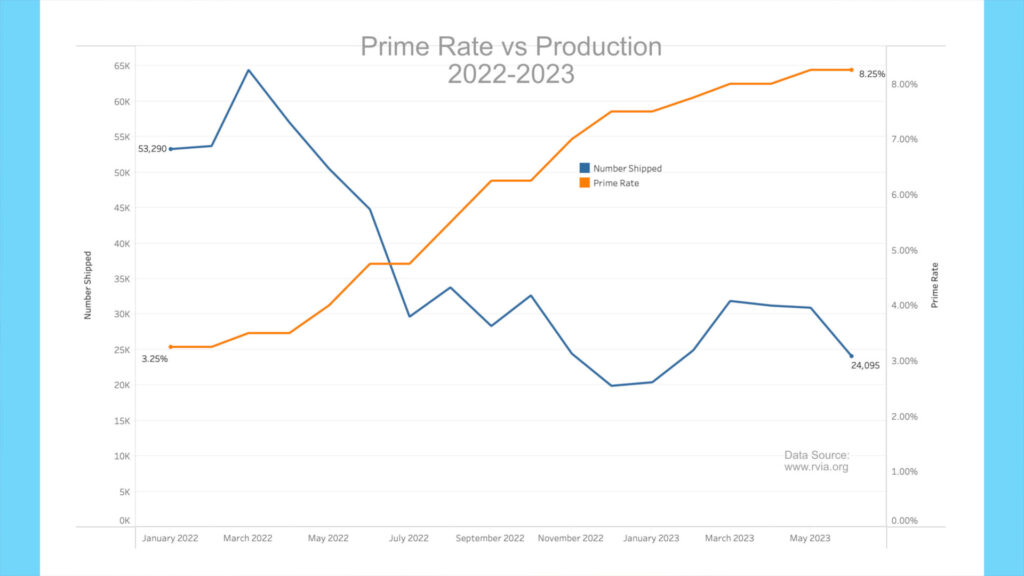
Fast forward to the past year and the 2018-2019 downward trend has reappeared along with the headwinds of higher interest rates. There is obviously a strong negative correlation between interest rates and production. A negative correlation shows that as interest rates increase, production decreases. It does not however reveal cause and effect. For the stats folks in the audience, the negative correlation (r-value) between interest rates and production was r = -.868 between January 2022 and June 2023. In 2018-2019 the negative correlation was r = -.43. What this says is that there is likely another factor involved in the slow decline of the industry and this factor in my opinion is poor quality.

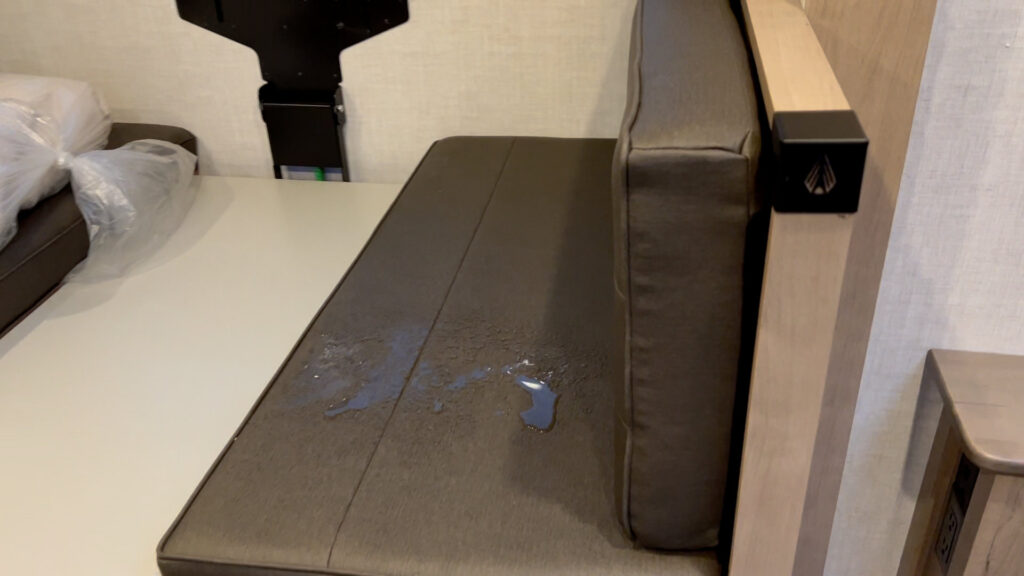
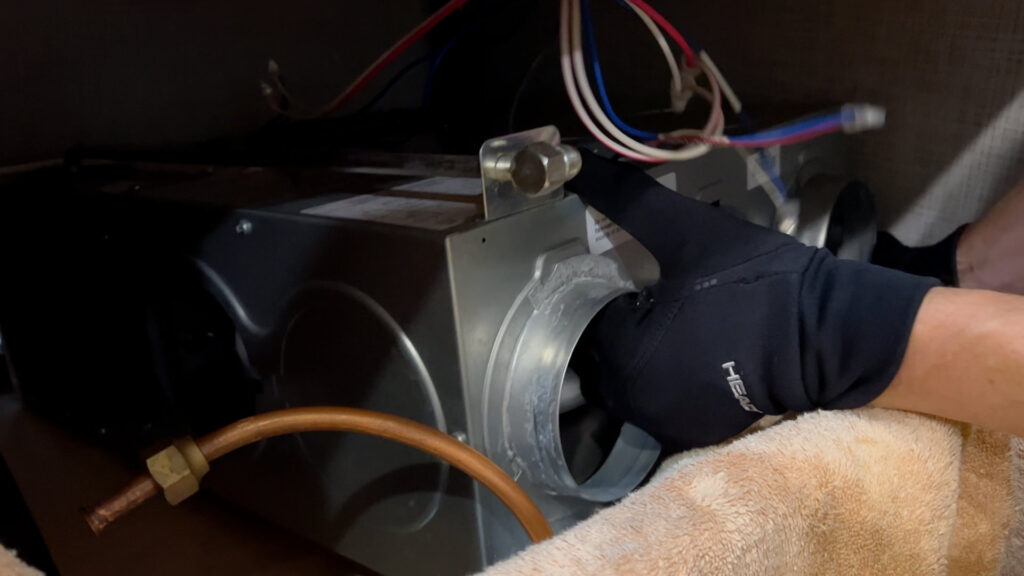
I experienced this firsthand when I purchased a brand-new Ember travel trailer in April of 2022. I was drawn to the Ember given the composite materials used in the structure. I had significant structural issues with my 2017 R-Pod 179 and the all-composite walls, floor, and roof on the new Ember were appealing. Unfortunately, the early Ember model I purchased was just not ready for market and had significant issues from the first day of ownership, including a slide leak. I ended up selling the unit after about 120 days of ownership. Some of these early production issues may have been addressed by now by the company, but for me the damage was real, and the financial loss was permanent. I just recently republished my initial 30-day ownership video for this trailer that I initially published in May of 2022. Link to Ember 30-Day ownership review video.
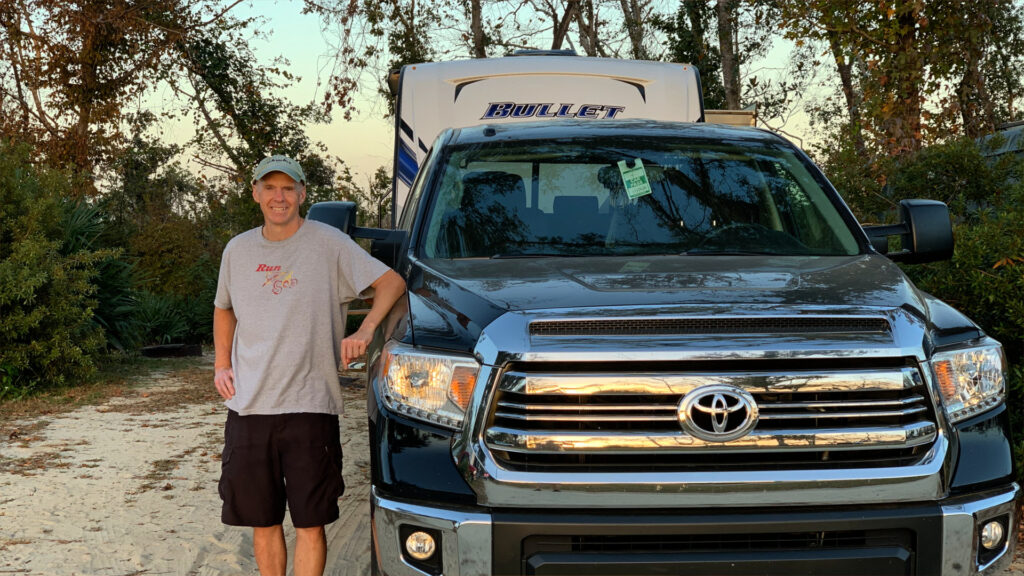
To be fair to Ember, my 2017 Forest River R-Pod 179 was no picnic and had real structural issues, including floor and wall sag, among many other things. These issues caused me significant stress. Also, my current RV, a 2020 Keystone Bullet, has had its share of very frustrating issues, mostly with components. You can view all my R-Pod issues in a video list I have, as well as watch my Keystone Bullet three-year review that goes through issues with that trailer. Link to R-Pod video list. Link to Keystone Bullet 3-year ownership review video.
From all I have read and all I have seen coming out of the industry lately, there is little hope for real change in RV quality. Labor incentives are still set for speedy production, build standards are self-regulated by the RVIA, and many larger social media influencers are also brand ambassadors for an industry partner or manufacturer, limiting what they can say about quality. Generally, you don’t change until you acknowledge that you have a problem. The quality problem is real, it causes real pain to real people who have spent significant money.
Okay, that should wrap things up.
All the best in your camping endeavors!
As always, thanks to our fans who support our efforts by starting their shopping from our Amazon Storefront and by their generous financial support by using the THANKS feature located under each YouTube video ($ within the Heart icon). Your support is greatly appreciated!